如果没有指定[REPOSITORY[:TAG]],REPOSITORY 和 TAG 都为<none>
提交的时候标记 TAG,后期可以根据 TAG 标记创建不同版本的镜像以及创建不同版本的容器
具体步骤
下载一个官方的基础镜像,例如:centos、ubuntu、alpine
基于基础镜像启动一个容器,并进入
在容器里面进行安装服务、修改配置等操作
提交一个新镜像 docker container commit
基于自己的镜像创建容器并访问、
案例:基于 alpine 基础镜像制作 nginx 镜像
下载最新版 alpine 基础镜像
1
root@Z510:~# docker pull alpine
启动 alpine 并进入
1 2
root@Z510:~# docker container run -it alpine / #
另开一个终端,将 shell 脚本拷贝到 alpine 镜像
1 2 3 4 5
lujinkai@Z510:~/www/script$ sudo docker container ls CONTAINER ID IMAGE COMMAND CREATED STATUS PORTS NAMES b8de1bdb6c88 alpine "/bin/sh" About a minute ago Up About a minute funny_chatelet
lujinkai@Z510:~/www/script$ sudo docker container cp -a ./alpine-docker/ b8de:/root
回到容器,运行 shell 脚本
1 2 3 4 5 6 7 8 9 10
root@Z510:~# docker container run -it alpine / # cd ~ # ls alpine-docker ~ # cd alpine-docker/ ~/alpine-docker # ./install.sh .... make[1]: Leaving directory '/root/alpine-docker/src/nginx-1.18.0' Nginx installed successfully! ~/alpine-docker # exit
提交镜像
1 2 3 4 5 6 7 8 9 10
lujinkai@Z510:~$ sudo docker container commit \ -a 'lujinkai<root@lujinkai.com>' \ -c 'EXPOSE 80' \ -c 'CMD ["/usr/local/nginx/sbin/nginx"]' \ b8de1bdb6c88 nginx-alpine:v1 lujinkai@Z510:~$ sudo !! sudo docker image ls REPOSITORY TAG IMAGE ID CREATED SIZE nginx-alpine v1 de56d80c5c8c 14 seconds ago 340MB alpine latest d6e46aa2470d 4 weeks ago 5.57MB
# docker run [选项] [镜像名] [shell命令] [参数] docker container run [OPTIONS] IMAGE [COMMAND] [ARG...]
COMMAND:一次性运行容器中命令 OPTIONS: -i, --interactive Keep STDIN open even if not attached,通常和-t 一起使用 -t, --tty 分配 pseudo-TTY,通常和-i 一起使用,注意对应的容器必须运行 shell 才支持进入 -d, --detach 后台运行容器,并返回容器 ID,默认前台运行 --name string 启动容器时会自动随机字符作为容器名,--name 指定容器名称 -h string 设置虚拟机内的 hostname --rm 退出后立即删除容器,一次性运行,下次从镜像中启动 -p, --publish list (小写p)暴露指定端口映射,为避免宿主机端口冲突,要做好端口规划 -P, --publish-all (大些P)暴露所有端口,随机,默认从 32768 开始 --dns list Set custom DNS servers --entrypoint string Overwrite the default ENTRYPOINT of the image --privileged 赋予虚拟机内的 root 真正的 root 权限,有权限宿主机,没有特殊需求不要使用 -e=[] 传递环境变量 --env-file=[] 传递环境变量,文件 --restart string 容器的重启策略,面向生产环境的启动策略 no # 默认策略,容器退出时不重启容器 on-failure # 容器非正常退出时(退出状态非 0),才会重启容器 on-failure:3 # 容器非正常退出时重启容器,最多重启 3 次 always # 容器退出时总是重启容器,设置为 always,则启动 docker 服务的时候会自动启动容器 unless-stopped # 容器退出时总是重启容器,但是不考虑在 docker 守护进程启动时就已经停止了的容器 -v,--volume list 数据卷相关
注意:容器启动后,如果容器内没有前台运行的进程,将自动退出停止
退出容器:exit 容器停止;ctrl+p+q 容器不停止
查看容器信息
查看当前存在的容器 ls
1 2 3 4 5 6 7 8 9 10
docker ps [OPTIONS] docker container ls [OPTIONS]
选项: -a, --all 查看所所有容器,包括退出状态的容器(默认只显示处于运行状态的容器) -q, --quiet Only display numeric IDs -s, --size 显示容器大小 -f, --filter 过滤,例如 `-f status=exited` -l, --latest 显示最新创建的容器 -n, --last int Show n last created containers (includes all states)(default -1)
Options: -a, --all Show all containers (default shows just running) --format string Pretty-print images using a Go template --no-stream Disable streaming stats and only pull the first result --no-trunc Do not truncate output
Options: -d, --detach Detached mode: run commandin the background --detach-keys string Override the key sequence for detaching a container -e, --env list Set environment variables -i, --interactive Keep STDIN open even if not attached --privileged Give extended privileges to the command -t, --tty Allocate a pseudo-TTY -u, --user string Username or UID (format: <name|uid>[:<group|gid>]) -w, --workdir string Working directory inside the containe
Options: --details Show extra details provided to logs -f, --follow Follow log output --since string Show logs since timestamp (e.g. 2013-01-02T13:23:37) or relative (e.g. 42m for 42 minutes) --tail string Number of lines to show from the end of the logs (default "all") -t, --timestamps Show timestamps --until string Show logs before a timestamp (e.g. 2013-01-02T13:23:37) or relative (e.g. 42m for 42 minutes)
传递运行命令
当docker run xxx启动容器,如果 xxx 容器中没有常驻前台的进程,xxx 会认为没什么任务,在启动后马上退出,有的服务支持前台运行,有的不支持,如果服务不支持前台运行,我们可以启动一个常驻前台的进程,阻止容器推出,常用的方式是让容器运行tail -f /etc/hosts命令,注意不要监听频繁更改的文件,避免产生不必要的磁盘 IO
范例:
1 2 3 4 5 6
# nginx前台运行,直接后台启动即可 docker container run -d nginx:1120 # alpine没有常驻前台的进程,以下两种方式均可 # 在容器内执行`/bin/sh`,然后把容器放到宿主机后台,sh是交互式命令,所以也有常驻前台的效果 docker container run -itd alpine docker run -d alpine 'tail -f /etc/hosts'
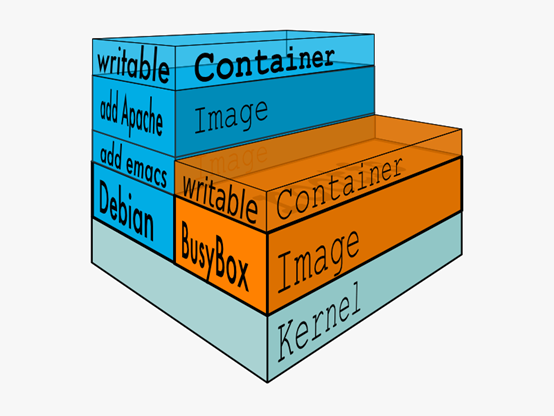
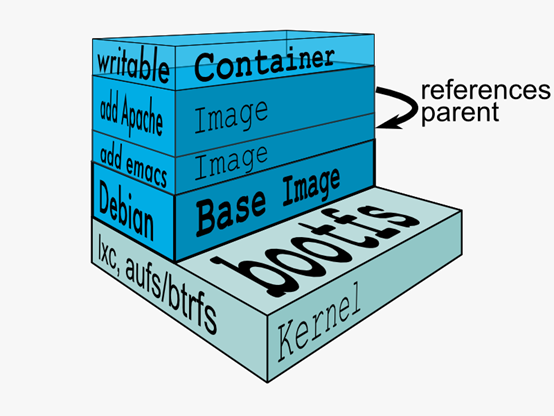
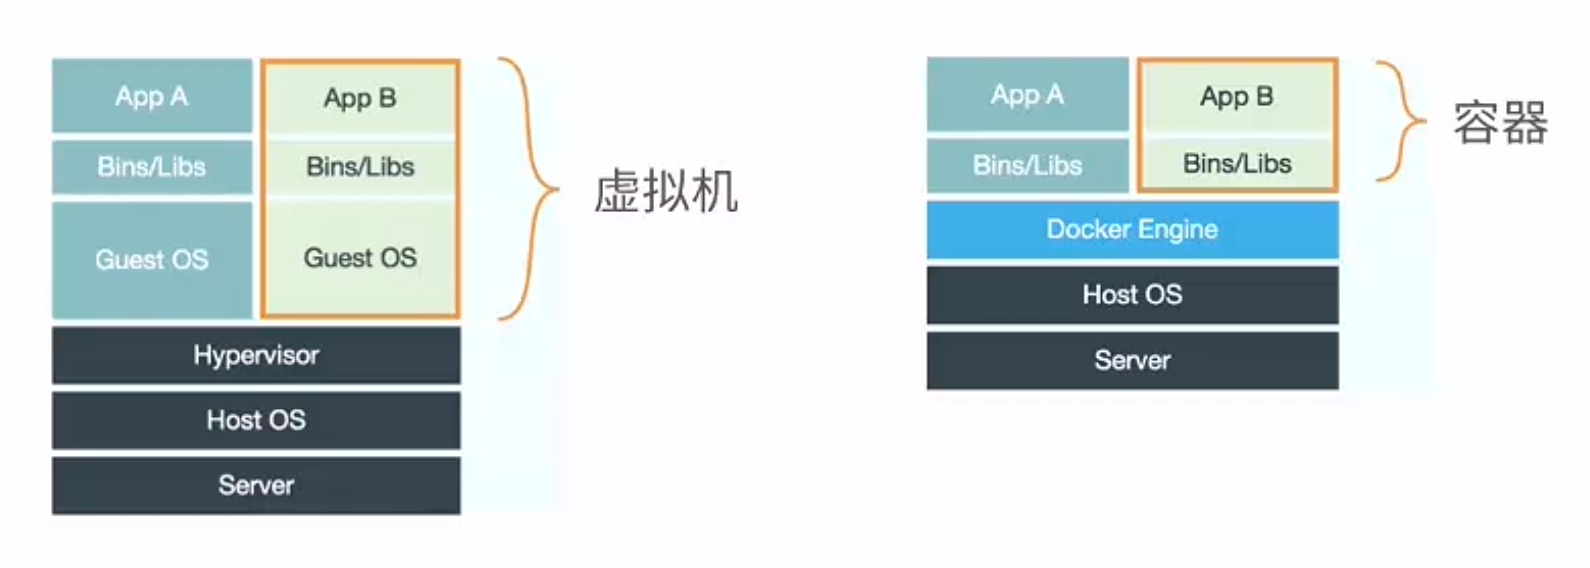
镜像理由是一层一层的文件系统:Union FS(联合文件系统),可以将几层目录挂载到一起(类似俄罗斯套娃),形成一个虚拟文件系统,虚拟文件系统的目录结构就像普通 linux 目录结构一样,镜像通过这些文件,再加上宿主机的内核共同构成了一个 linux 的虚拟环境,每一层文件系统叫做一层 layer,联合文件系统可以对每一层文件系统设置三种权限:readonly、readwrite、writeout-able。但是镜像中每一层文件系统都是只读的,构建镜像的时候,从一个最基本的操作系统开始,每个构建提交的操作都相当与做一层的修改,增加了一层文件系统,一层层往上叠加,上层的修改会覆盖底层该位置的可见性,当使用镜像的时候,我们只会看见一个整体,并不知道里面有几层,实际上也不需要知道
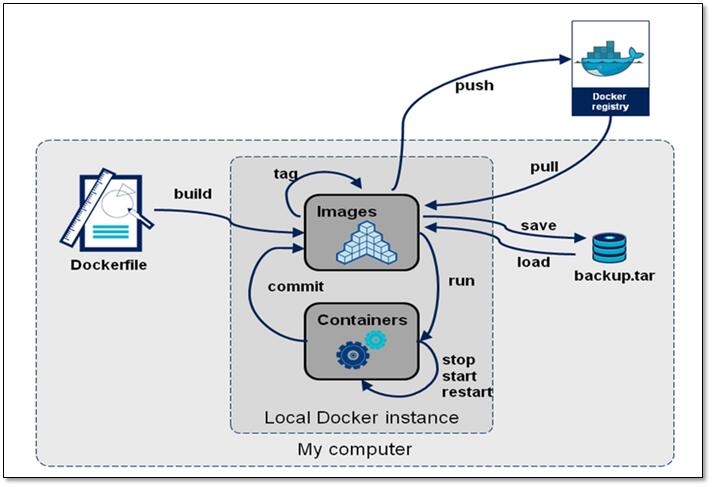
Commands: build # 从Dockerfile中构建镜像 history# 显示镜像分层历史 import # 从tar包中的内容创建一个新的文件系统映像[对应 container export] inspect # 显示容器详细信息 load # 从一个tar包中加载一个镜像[对应save] ls List images prune # 移除未使用的镜像 pull Pull an image or a repository from a registry push Push an image or a repository to a registry rm# 移除一个或多个镜像 save # 保存一个镜像为一个tar包[对应load] tag Create a tag TARGET_IMAGE that refers to SOURCE_IMAGE
下载镜像 pull
1 2 3 4 5 6 7 8 9 10 11 12
# docker help pull docker pull [OPTIONS] NAME[:TAG|@DIGEST]
Options: -a, --all-tags Download all tagged images in the repository --disable-content-trust Skip image verification (default true) --platform string Set platform if server is multi-platform capable -q, --quiet Suppress verbose output
NAME 镜像名,仓库服务器:端口/项目名称/镜像名称 :TAG 版本号,如果不指定:TAG,则下载最新版镜像 @DIGEST 摘要
1 2 3 4 5 6 7
[root@ubuntu1804 ~]#docker pull hello-world Using default tag: latest # tag 默认下载tag为latest latest: Pulling from library/hello-world 1b930d010525: Pull complete # 分层下载 Digest: sha256:9572f7cdcee8591948c2963463447a53466950b3fc15a247fcad1917ca215a2f # 摘要 Status: Downloaded newer image for hello-world:latest docker.io/library/hello-world:latest # 下载的完整地址
# docker image ls --help docker image ls [OPTIONS] [REPOSITORY[:TAG]]
Options: -a, --all Show all images (default hides intermediate images) --digests Show digests -f, --filter filter Filter output based on conditions provided --format string Pretty-print images using a Go template --no-trunc # 不截断输出,即展示完整的容器ID -q, --quiet # 只展示容器ID
REPOSITORY # 镜像所属的仓库名称 TAG # 镜像版本号(标识符),默认为latest
1 2 3 4 5 6 7 8 9 10 11 12 13
$ docker image ls REPOSITORY TAG IMAGE ID CREATED SIZE nginx latest 605c77e624dd 11 months ago 141MB
$ docker image ls -q 605c77e624dd
$ docker image ls --no-trunc REPOSITORY TAG IMAGE ID CREATED SIZE nginx latest sha256:605c77e624ddb75e6110f997c58876baa13f8754486b461117934b24a9dc3a85 11 months ago 141MB
IMAGE ID # 镜像唯一ID标识,如果ID相同,说明是同一个镜像有多个名称
REPOSITORY 仓库:
由某特定的 docker 镜像的所有迭代版本组成的镜像仓库
一个 Registry 中可以存在多个 Repository
Repository 可分为“顶层仓库”和“用户仓库”
Repository 用户仓库名称一般格式为“用户名/仓库名”
每个 Repository 仓库可以包含多个 Tag(标签),每个标签对应一个镜像
镜像导出 save
将本地镜像导出为一个文件(tar 格式),然后复制到其他服务器,导入使用
1 2 3 4 5
# docker help image save Usage: docker image save [OPTIONS] IMAGE [IMAGE...]
Options: -o, --output string Write to a file, instead of STDOUT
常见用法:以下两种用法等价
1 2
docker save -o /path/file.tar IMAGE1 IMAGE2 ... docker save IMAGE1 IMAGE2 ... > /path/file.tar
镜像导入 load
save 导出的镜像 tar 文件,使用load导入
1 2 3 4 5 6 7
# docker help image load
Usage: docker image load [OPTIONS]
Options: -i, --input string Read from tar archive file, instead of STDIN -q, --quiet Suppress the load output
Options: --config string Location of client config files (default "/root/.docker") -c, --context string Name of the context to use to connect to the daemon (overrides DOCKER_HOST env var and default context set with "docker context use") -D, --debug Enable debug mode -H, --host list Daemon socket(s) to connect to -l, --log-level string Set the logging level ("debug"|"info"|"warn"|"error"|"fatal") (default "info") --tls Use TLS; implied by --tlsverify --tlscacert string Trust certs signed only by this CA (default "/root/.docker/ca.pem") --tlscert string Path to TLS certificate file (default "/root/.docker/cert.pem") --tlskey string Path to TLS key file (default "/root/.docker/key.pem") --tlsverify Use TLS and verify the remote -v, --version Print version information and quit
Commands: attach Attach local standard input, output, and error streams to a running container build Build an image from a Dockerfile commit Create a new image from a container's changes cp Copy files/folders between a container and the local filesystem create Create a new container diff Inspect changes to files or directories on a container's filesystem events Get real time events from the server exec Run a commandin a running container export Export a container's filesystem as a tar archive history Show the history of an image images List images import Import the contents from a tarball to create a filesystem image info Display system-wide information inspect Return low-level information on Docker objects kill Kill one or more running containers load Load an image from a tar archive or STDIN login Log in to a Docker registry logout Log out from a Docker registry logs Fetch the logs of a container pause Pause all processes within one or more containers port List port mappings or a specific mapping for the container ps List containers pull Pull an image or a repository from a registry push Push an image or a repository to a registry rename Rename a container restart Restart one or more containers rm Remove one or more containers rmi Remove one or more images run Run a command in a new container save Save one or more images to a tar archive (streamed to STDOUT by default) search Search the Docker Hub for images start Start one or more stopped containers stats Display a live stream of container(s) resource usage statistics stop Stop one or more running containers tag Create a tag TARGET_IMAGE that refers to SOURCE_IMAGE top Display the running processes of a container unpause Unpause all processes within one or more containers update Update configuration of one or more containers version Show the Docker version information wait Block until one or more containers stop, then print their exit codes Run 'docker COMMAND --help' for more information on a command. To get more help with docker, check out our guides at https://docs.docker.com/go/guides/
# 添加root'@'127.0.0.1用户 root@u1:~# docker exec -it mysql bash ot@829aa7ccf010:/# mysql -uroot -p123456 -e "CREATE USER 'root'@'127.0.0.1' IDENTIFIED BY \"123456\";" root@829aa7ccf010:/# mysql -uroot -p123456 -e "GRANT ALL ON *.* TO 'root'@'127.0.0.1';"
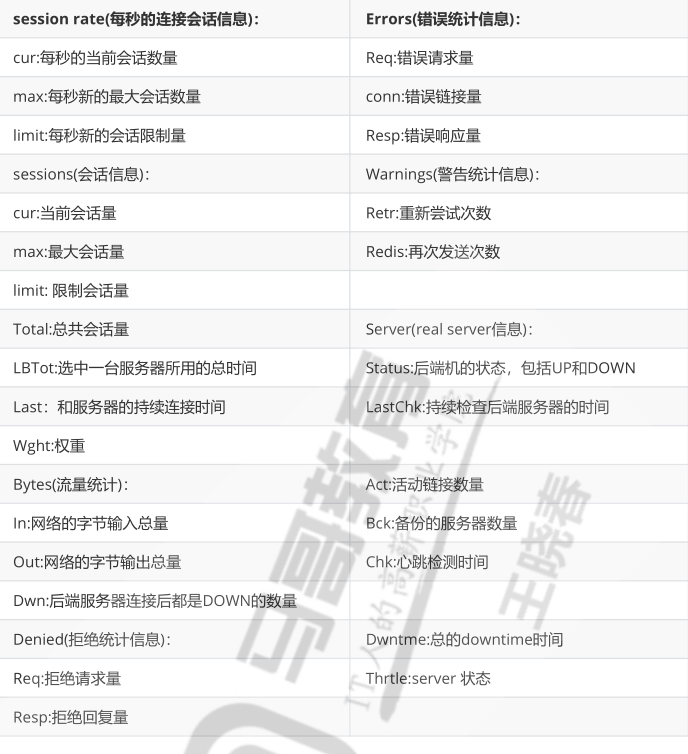
listen web_host bind 10.0.0.7:80,:8801-8810,10.0.0.7:9001-9010 mode http log global balance static-rr server web1 10.0.0.17:80 weight 1 check inter 3000 fall 2 rise 5 server web2 10.0.0.27:80 weight 2 check inter 3000 fall 2 rise 5
hdr string # 提取在一个HTTP请求报文的首部 hdr([<name> [,<occ>]]) # 完全匹配字符串,header的指定信息,<occ> 表示在多值中使用的值的出现次数 hdr_beg ([<name> [,<occ>]]) # 前缀匹配,header中指定匹配内容的begin hdr_end ([<name> [,<occ>]]) # 后缀匹配,header中指定匹配内容end hdr_dom ([<name> [,<occ>]]) # 域匹配,header中的domain name hdr_dir ([<name> [,<occ>]]) # 路径匹配,header的uri路径 hdr_len ([<name> [,<occ>]]) # 长度匹配,header的长度匹配 hdr_reg ([<name> [,<occ>]]) # 正则表达式匹配,自定义表达式(regex)模糊匹配 hdr_sub ([<name> [,<occ>]]) # 子串匹配,header中的uri模糊匹配 base : string base : exact string match base_beg : prefix match base_dir : subdir match base_dom : domain match base_end : suffix match base_len : length match base_reg : regex match base_sub : substring match path : string path : exact string match path_beg : prefix match # 请求的URL开头,如/static、/images、/img、/css path_end : suffix match # 请求的URL中资源的结尾,如 .gif .png .css .js .jpg .jpeg path_dom : domain match path_dir : subdir match path_len : length match path_reg : regex match path_sub : substring match url : string url :exact string match url_beg : prefix match url_dir : subdir match url_dom : domain match url_end : suffix match url_len : length match url_reg : regex match url_sub : substring match dst # 目标ip dst_port # 目标port src # 源IP src_port # 源PORT
flags
1 2 3 4 5 6 7
-i : 不区分大小写 -f : 从文件中加载pattern匹配方法 -m : 使用指定的pattern匹配方法 -n : 不做DNS解析 -M : load the file pointed by -f like a map file. -u : 禁止acl重名,否则多个同名ACL匹配或关系 -- : force end of flags. Useful when a string looks like one of the flags.
- "found" : only check if the requested sample could be found in the stream, but do not compare it against any pattern. It is recommended not to pass any pattern to avoid confusion. This matching method is particularly useful to detect presence of certain contents such as headers, cookies, etc... even if they are empty and without comparing them to anything nor counting them.
- "bool" : check the value as a boolean. It can only be applied to fetches whichreturn a boolean or integer value, and takes no pattern. Value zero or false does not match, all other values do match.
- "int" : match the value as an integer. It can be used with integer and boolean samples. Boolean false is integer 0, true is integer 1.
- "ip" : match the value as an IPv4 or IPv6 address. It is compatible with IP address samples only, so it is implied and never needed.
- "bin" : match the contents against a hexadecimal string representing a binary sequence. This may be used with binary or string samples.
- "len" : match the sample's length as an integer. This may be used with binary or string samples. - "str" : exact match : match the contents against a string. This may be used with binary or string samples. - "sub" : substring match : check that the contents contain at least one of the provided string patterns. This may be used with binary or string samples. - "reg" : regex match : match the contents against a list of regular expressions. This may be used with binary or string samples. - "beg" : prefix match : check that the contents begin like the provided string patterns. This may be used with binary or string samples. - "end" : suffix match : check that the contents end like the provided string patterns. This may be used with binary or string samples. - "dir" : subdir match : check that a slash-delimited portion of the contents exactly matches one of the provided string patterns. This may be used with binary or string samples. - "dom" : domain match : check that a dot-delimited portion of the contents exactly match one of the provided string patterns. This may be used with binary or string samples.
operator
ACL 操作符
整数比较:eq、ge、gt、le、lt
字符比较:
1 2 3 4 5 6
- exact match (-m str) # 字符串必须完全匹配模式 - substring match (-m sub) # 在提取的字符串中查找模式,如果其中任何一个被发现,ACL将匹配 - prefix match (-m beg) # 在提取的字符串首部中查找模式,如果其中任何一个被发现,ACL将匹配 - suffix match (-m end) # 将模式与提取字符串的尾部进行比较,如果其中任何一个匹配,则ACL进行匹配 - subdir match (-m dir) # 查看提取出来的用斜线分隔(“/")的字符串,如其中任一个匹配,则ACL进行匹配 - domain match (-m dom) # 查找提取的用点(“.")分隔字符串,如果其中任何一个匹配,则ACL进行匹配
# 一个网卡接口可以关联多个连接,但同时只能有一个活跃,切换加入了网络组的连接为活跃状态 [root@centos8 ~]# nmcli connection up team0-eth1 Connection successfully activated (D-Bus active path: /org/freedesktop/NetworkManager/ActiveConnection/14) [root@centos8 ~]# nmcli connection up team0-eth2 Connection successfully activated (D-Bus active path: /org/freedesktop/NetworkManager/ActiveConnection/15) [root@centos8 ~]# nmcli connection up team0-eth3 Connection successfully activated (D-Bus active path: /org/freedesktop/NetworkManager/ActiveConnection/16) Connection successfully activated (D-Bus active path: /org/freedesktop/NetworkManager/ActiveConnection/16)
# 看一下网络组的状态,都启动了 [root@centos8 ~]# teamdctl if-team0 state setup: runner: loadbalance ports: eth1 link watches: link summary: up instance[link_watch_0]: name: ethtool link: up down count: 0 eth2 link watches: link summary: up instance[link_watch_0]: name: ethtool link: up down count: 0 eth3 link watches: link summary: up instance[link_watch_0]: name: ethtool link: up down count: 0
实验一:环境 vmware,三台虚拟机 A、B、C,A 是仅主机模式,C 是 nat 模式,所以 AC 之间不能通信,B 配置两张网卡,一张仅主机,一张 nat,所以 B 既能和 A 通信,也能和 C 通信,所以让 B 充当网桥,把 A 和 C 桥接在一起,从而实现 AC 通信。实现方式可以安装 bridge-utils,也可以使用 nmcli 命令。
ss -l #显示本地打开的所有端口 ss -pl #显示每个进程具体打开的socket ss -t -a #显示所有tcp socket ss -u -a #显示所有的UDP Socekt ss -o state established '( dport = :ssh or sport = :ssh )'#显示所有已建立的ssh连接 ss -o state established '( dport = :http or sport = :http )'#显示所有已建立的HTTP连接 ss -s #列出当前socket详细信息
[root@centos8 ~]#ss -no state established '( dport = :21 or sport = :21 )' Netid Recv-Q Send-Q Local Address:Port Peer Address:Port tcp 0 0 [::ffff:10.0.0.8]:21 [::ffff:10.0.0.7]:46638 timer:(keepalive,119min,0)
ifconfig
interface config 接口配置,ifconfig 命令用于显示或设置网络设备。 来自于 net-tools 包,建议使用 ip 代替
1 2 3 4
-a # 显示全部接口信息,包括已经被禁用的网卡 -s # 示摘要信息(类似于 netstat -i) up # 启用网卡,调用的是/usr/sbin/ifup脚本 down # 禁用网卡,调用的是/usr/sbin/ifdown脚本
给 ens37 添加 ip:11.0.0.120/24 ip address add 11.0.0.120/24 dev ens37
给 ens37 添加 ip:11.0.0.130/24 同时设置别名 ip address add 11.0.0.130/24 dev ens37 label ens37:1
示例:删除 ens37 网卡的 ip
1 2
[root@centos7 ~]#ip address del 11.0.0.120/24 dev ens37 [root@centos7 ~]#ip address del 11.0.0.130/24 dev ens37
示例:修改 ens37 网卡的 ip
1 2 3
# 添加新的,删除旧的 [root@centos7 ~]#ip address add 11.0.0.111/24 dev ens37 [root@centos7 ~]#ip address del 11.0.0.110/24 dev ens37
示例:设置 ip 过期时间
示例:replace 直接替换 ip
网卡管理
1 2 3 4 5 6 7
ip linkset eth1 down #禁用网卡 ip linkset eth1 name wangnet #网卡改名 ip linkset wangnet up #启用网卡 ip addr flush dev eth0 #清除网络地址 #网卡别名 ip addr add 172.16.100.100/16 dev eth0 label eth0:0 ip addr del 172.16.100.100/16 dev eth0 label eth0:0
示例:临时修改网卡名称
1 2 3
$iplinkset eth0 down # 关闭网卡 $iplinkset eth0 name abc # 修改网卡 $iplinkset abc up # 启动网卡
路由管理
1 2 3 4 5 6 7 8 9 10 11 12 13
#添加路由:via是 经过 的意思 ip route add <TARGET> via <GW> dev <IFACE> src <SOURCE_IP> TARGET: 主机路由:IP 网络路由:NETWORK/MASK #添加网关: ip route add default via GW dev IFACE #删除路由:怎么添加就怎么删除,ip route 查询的直接整行复制就是 TARGET ip route del TARGET #显示路由: ip route show|list #清空路由表: ip route flush [dev IFACE] [via PREFIX]
示例:
1 2 3 4 5 6 7
[root@centos7 ~]#ip route add 1.1.1.0/24 via 10.0.0.200 dev ens33 [root@centos7 ~]#ip route default via 10.0.0.2 dev ens33 proto static metric 100 1.1.1.0/24 via 10.0.0.200 dev ens33 10.0.0.0/24 dev ens33 proto kernel scope link src 10.0.0.100 metric 100 11.0.0.0/24 dev ens37 proto kernel scope link src 11.0.0.110 metric 101 [root@centos7 ~]#ip route del 1.1.1.0/24 via 10.0.0.200 dev ens33
示例:查看路由过程
1 2 3 4 5 6 7
[root@centos8 ~]#ip route get 10.0.0.7 #查看到达10.0.0.7所使用的路由 10.0.0.7 dev eth0 src 10.0.0.8 uid 0 cache
[root@centos7 ~]#ip route get 47.104.192.22 #查看到达47.104.192.22所使用的路由 47.104.192.22 via 10.0.0.2 dev ens33 src 10.0.0.100 cache
[root@centos8 ~]# cat /etc/services | grep mysql mysql 3306/tcp # MySQL mysql 3306/udp # MySQL mysql-cluster 1186/tcp # MySQL Cluster Manager mysql-cluster 1186/udp # MySQL Cluster Manager mysql-cm-agent 1862/tcp # MySQL Cluster Manager Agent mysql-cm-agent 1862/udp # MySQL Cluster Manager Agent mysql-im 2273/tcp # MySQL Instance Manager mysql-im 2273/udp # MySQL Instance Manager mysql-proxy 6446/tcp # MySQL Proxy mysql-proxy 6446/udp # MySQL Proxy mysqlx 33060/tcp # MySQL Database Extended Interface
范例:找到端口冲突的应用程序
1 2 3 4 5 6
# ss命令查看套接字,找到冲突的端口号,l参数表示查看被占用(监听)的端口号 ss -ntl ## p参数可以看到占用该端口的进程 ss -ntlp ## 或者使用lsof能查看更详细的进程信息 lsof -i :port
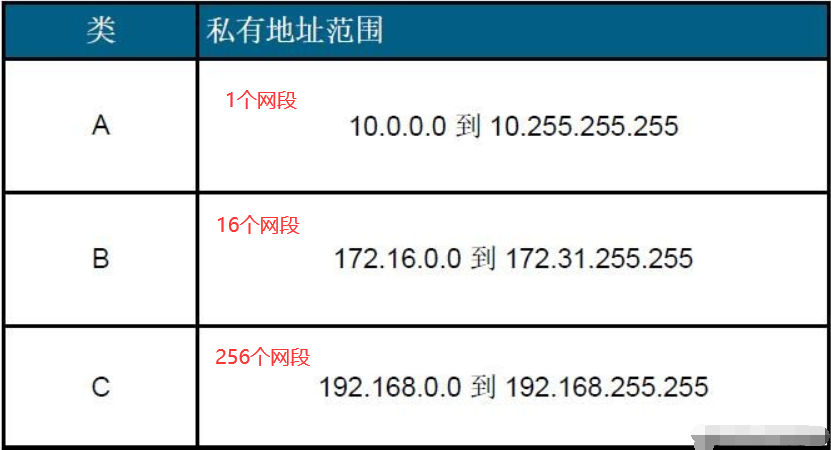
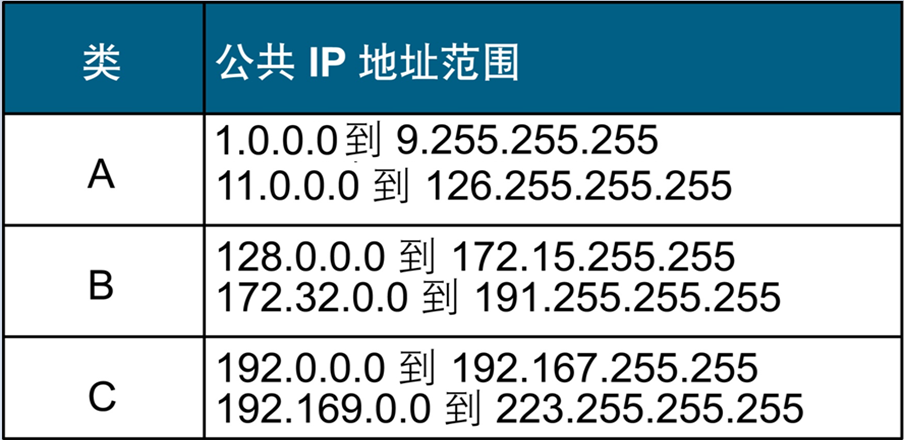
A 类:网络 ID 位是最高 8 位,主机 ID 是 24 位低位。规定最高位是 1,所以 A 类只剩下 2^7(128)个网段(网络),也就是 0-127,但是 0 保留不能用,表示未知地址,127 用于回环网卡,所以 ipv4 中处于 A 类网络的一共有 126 个网段,1.x.x.x-126.x.x.x。所以 10.x.x.x、126.x.x.x 这种一看就是 A 类,而 172.x.x.x 这种大于 126,一看就不是 A 类网络
B 类:网络 ID 位是最高 16 位,主机 ID 是 16 位低位。规定最高两位是 10,所有 B 类网络有 2^14 个网段,128.0.x.x-191.255.x.x。
C 类:网络 ID 位是最高 24 位,主机 ID 是 8 位低位。规定前三位是 110,所以 C 类网络中有 2^21 个网段,192.0.0.x-223.255.255.x。
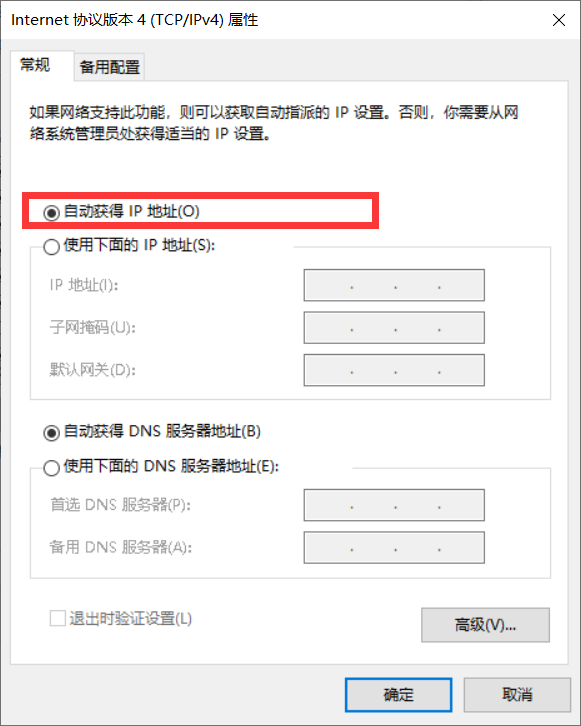
DHCP 服务器向 DHCP 客户机出租的 IP 地址一般都有一个租借期限, 期满后 DHCP 服务器便会收回出租的 IP 地址,如果 DHCP 客户机要延长其 IP 租约, 则必须更新其 IP 租约:租赁时间到达 50%时续租,如果 DHCP Server 没有回应,等到租期的 7/8 时,主机会再发送一次广播请求。
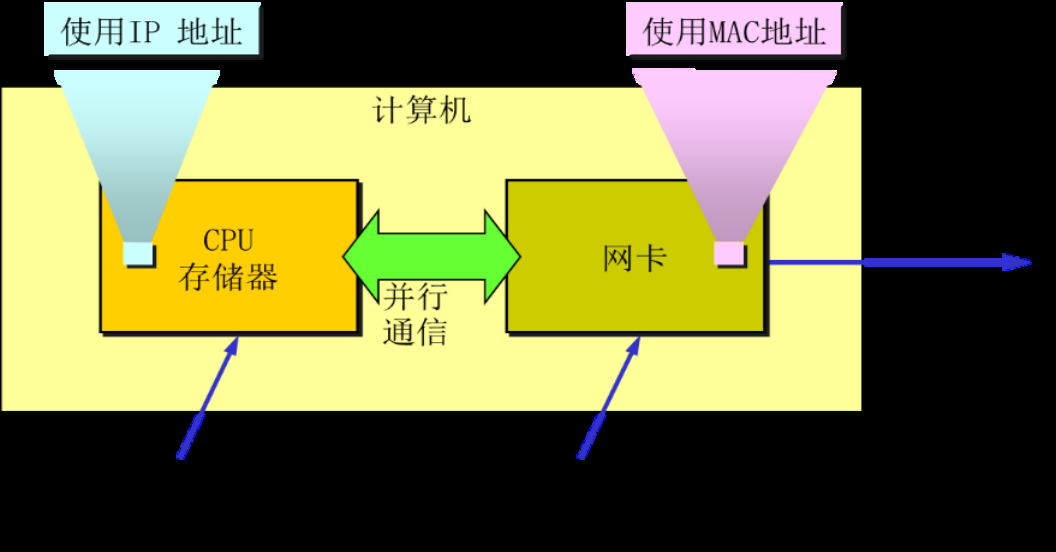
显然:组播和多播的 MAC 地址是逻辑地址,在网络上,没有一个设备的 MAC 地址是一个组播 MAC 地址或者多播地址 FF FF FF FF FF FF。对于网络设备上固化的 MAC 地址,只能是单播地址,也就是 MAC 帧中的发送方的 MAC 地址第 48 位只能 0。
接收数据,在二层根据接收方 MAC 地址的 48bit 判断单播、组播还是多播。如果是单播,再判断接收方 MAC 地址是否为自身的 MAC 地址,不是就丢弃;如果是多播,无条件接收;如果是组播,判断是否为本机监听的组播,不是就丢弃。
发送端发送组播包时,目的 mac 地址是根据组播 ip 和固定格式进行映射,并没有指向固定目标主机,向网络上进行发送。
接收端接收组播包时,同样需要对组播 ip 和固定格式进行映射,生成的组播 mac 地址与接收到的数据包 mac 比对,若相通往上传。
路由器可以不接受广播和组播
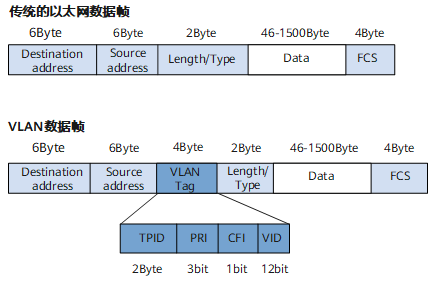
虚拟局域网 VLAN
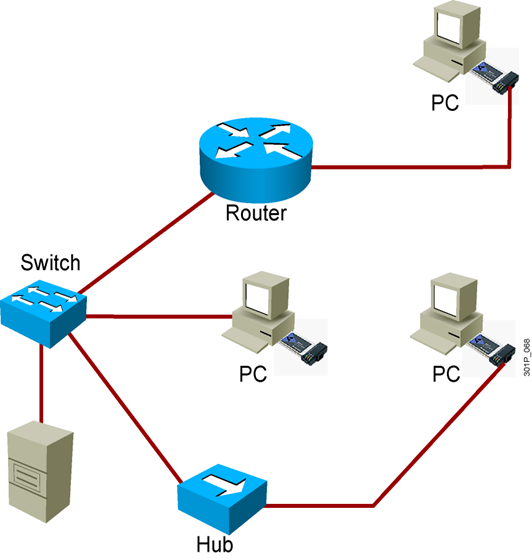
企业内部的局域网,尤其是比较大的局域网,有很多交换机,交换机不隔离广播,所以一台 PC 发送消息,通过路由器、核心交换机广播到局域网中所有的 PC,这样是不合理的。路由器可以隔离,但是在企业内部是不会用路由器来隔离广播的,因为路由器很贵,而且接口比较少,所以一般只用来连接外网。家用的路由器实际上是交换机和路由器的结合体。
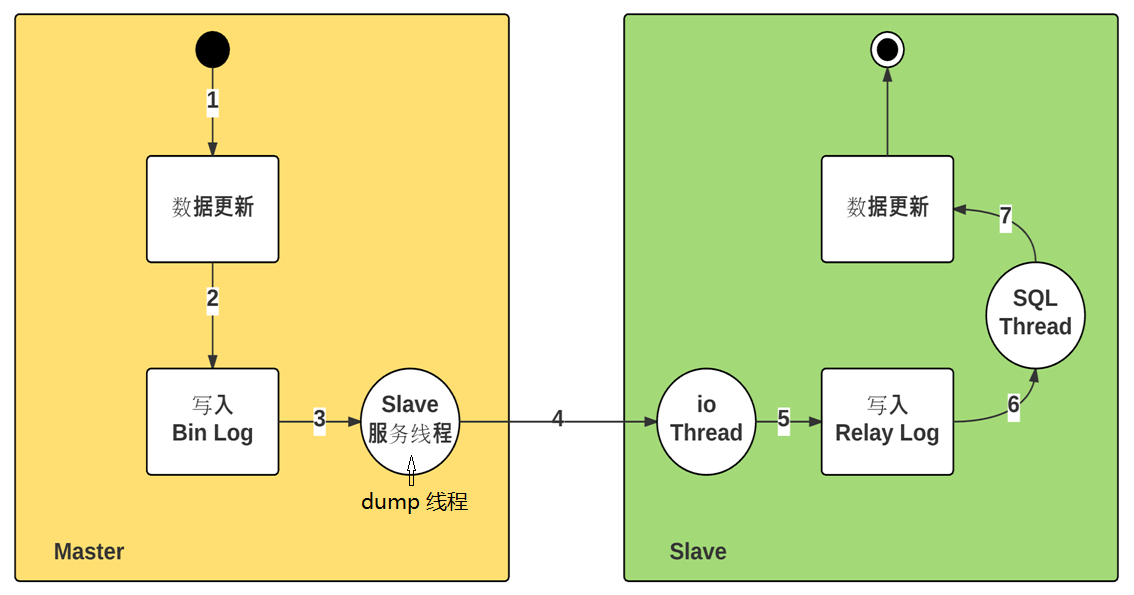
2、在主库上dump这三张表,并记录下同步的binlog和POS点 mysqldump -uroot -pmagedu -q --single-transaction --master-data=2 testdb A B C >/backup/A_B_C.sql 3、查看A_B_C.sql文件,找出记录的binlog和POS点 head A_B_C.sql 例如:MASTERLOGFILE='mysql-bin.888888', MASTERLOGPOS=666666;
#以下指令是为了保障其他表的数据不丢失,一直同步直到那个点结束,A,B,C表的数据在之前的备份已 经生成了一份快照,只需要导入进入,然后开启同步即可 4、把A_B_C.sql拷贝到Slave机器上,并做指向新位置 mysql>start slave until MASTERLOGFILE='mysql-bin.888888', MASTERLOGPOS=666666;
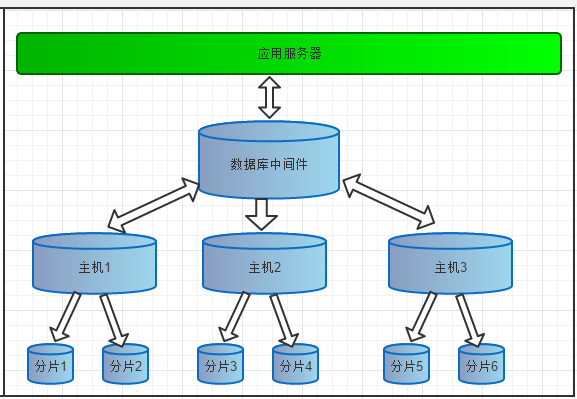
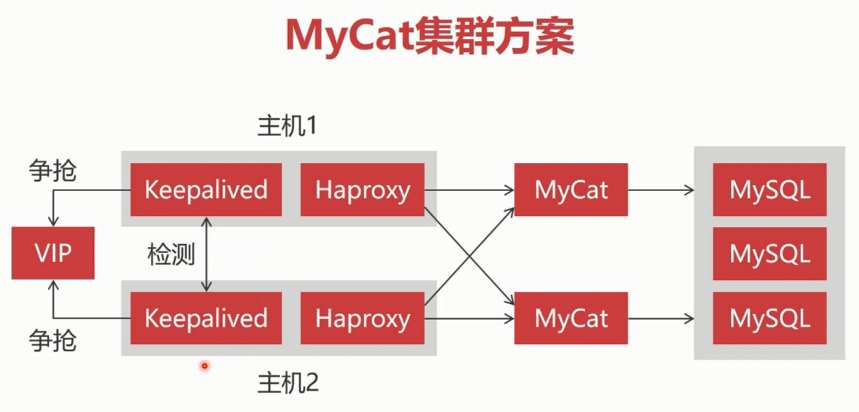
进入到下一个阶段,数据量继续增大,这时候我们应该把数据切分到多个 MySQL 节点上,用 MyCat 管理数据切分。当然还要做数据的读写分离等等,这里不展开讨论。在后台做水平切分的同时,业务系统也可以引入负载均衡、分布式架构等等。理论上,使用了冷热数据分离之后,水平切分这种方式可以继续维持很长一段时间,数据量再大也不怕,定期归档就好了。
select*from test where id<>500; select*from test where id in (1,2,3,4,5); select*from test wherenotin (6,7,8,9,0); select*from test wherenotexists (select1from test_02 where test_02.id=test.id);
LIKE 模糊搜索时,前置通配符会让索引失效,例如查询姓张的人 like 张%会走索引,但是查询叫明的人 like %明,索引会失效
对索引使用计算,可能会让索引失效,例如:
1 2 3 4
select*from test whereupper(name)='SUNYANG'; # 索引失效 select*from test where name=upper('sunyang'); # 没有对索引进行计算,所以索引不失效 select*from sunyang where id/2=:type_id; # 索引失效 select*from sunyang where id=:type_id*2; # 没有对索引进行计算,所以索引不失效
[root@c71 mysqlbinlog]$ll ./mysql-bin.* -rw-r----- 1 mysql mysql 177 Oct 16 21:37 ./mysql-bin.000001 -rw-r----- 1 mysql mysql 3683 Oct 16 22:38 ./mysql-bin.000002 -rw-r----- 1 mysql mysql 228 Oct 22 09:26 mysql-bin.index
binlog-format = STATEMENT | ROW | MIXED:
statement:基于语句记录,日志量较少,但生产中不推荐使用,因为二进制日志是用来备份的,如果记录了类似update table set time = now();的语句,那将来恢复备份的时候 now()值就变了