Start Of Authority:起始授权记录,一个区域解析库有且仅能有一个 SOA 记录,必须位于解析库的第一条记录
范例:
1 2 3 4 5 6 7 8 9 10 11 12 13
; zone file fragment for mytest.cn ;$TTL 600 $ORIGIN mytest.cn. ; SOA record ; owner-name ttl class rr name-server email-addr (sn ref ret ex min) @ IN SOA ns1.mytest.cn. root.mytest.cn. ( 0 ; serial 1D ; refresh 1H ; retry 1W ; expire 3H ) ; minimum
# M:分钟;H:小时;D:天;W:周
owner-name:当前域的名称,通常用 @ 来表示,优先继承$ORIGIN
value:可以设置多个值,本例中设置了三个值,依次为:
name-server:当前域的主 DNS 服务器的 FQDN,形式为 xxx.ower-name,ower-name 可以省略,例如这里ns1.mytest.cn.还可以写成ns1,下面得配合一条 A 记录把它解析成 ip
# name [TTL] IN rr_type value # name: 当前区域的名字 # value: 当前区域的某DNS服务器的名字,例如ns.magedu.org magedu.org. IN NS ns1.magedu.org. magedu.org. IN NS ns2.magedu.org.
注意:
相邻的两个资源记录的 name 相同时,后续的可省略
对 NS 记录而言,任何一个 ns 记录后面的服务器名字,都应该在后续有一个 A 记录
一个区域可以有多个 NS 记录
MX
Mail eXchanger,邮件交换器,范例:
1 2 3 4 5 6 7
# name [TTL] IN rr_type value # name: 当前区域的名字 # value: 当前区域的某邮件服务器(smtp服务器)的主机名 magedu.org. IN MX 10 mx1.magedu.org. IN MX 20 mx2.magedu.org. mx1 A 10.0.0.100 mx2 A 10.0.0.200
注意:
一个区域内,MX 记录可有多个;但每个记录的 value 之前应该有一个数字(0-99),表示此服务器的优先级;数字越小优先级越高
对 MX 记录而言,任何一个 MX 记录后面的服务器名字,都应该在后续有一个 A 记录
A
internet Address,作用:FQDN –> IP,范例:
1 2 3 4 5 6 7 8 9 10
# name: 某主机的FQDN,例如:www.magedu.org. # value: 主机名对应主机的IP地址 # 避免用户写错名称时给错误答案,可通过泛域名解析进行解析至某特定地址 www.magedu.org. IN A 1.1.1.1 www.magedu.org. IN A 2.2.2.2 mx1.magedu.org. IN A 3.3.3.3 mx2.magedu.org. IN A 4.4.4.4 $GENERATE 1-254 HOST$ IN A 1.2.3.$ *.magedu.org. IN A 5.5.5.5 magedu.org. IN A 6.6.6.6
AAAA
FQDN –> IPv6
1 2
name: FQDN value: IPv6
PTR
PoinTeR,IP –> FQDN,范例:
1 2 3 4 5
# name: IP,有特定格式,把IP地址反过来写,1.2.3.4,要写作4.3.2.1;而有特定后缀:in-addr.arpa.,所以完整写法为:4.3.2.1.in-addr.arpa. # value: FQDN 4.3.2.1.in-addr.arpa. IN PTR www.magedu.org. # 网络地址及后缀可省略;主机地址依然需要反着写,如1.2.3为网络地址,可简写成: 4 IN PTR www.magedu.org.
CNAME
Canonical Name,别名记录,范例:
1 2 3
# name: 别名的FQDN # value: 真正名字的FQDN www.magedu.org. IN CNAME websrv.magedu.org.
allow-query:允许谁向此 DNS 进行查询。注释掉和修改localhost;为any;效果是一样的,设置localhost则允许本机的 ip 地址列表
2. 定义区域解析库文件
默认位置:/var/named/目录下;
内容包括两部分:宏定义 和 资源记录,范例:
1 2 3 4 5 6 7 8 9 10 11 12 13 14 15 16 17 18 19
$TTL 86400 $ORIGIN magedu.org. @ IN SOA ns1.magedu.org. admin.magedu.org ( 2015042201 1H 5M 7D 1D ) IN NS ns1 IN NS ns2 IN MX 10 mx1 IN MX 20 mx2 ns1 IN A 172.16.100.11 ns2 IN A 172.16.100.12 mx1 IN A 172.16.100.13 mx2 IN A 172.16.100.14 websrv IN A 172.16.100.11 websrv IN A 172.16.100.12 www IN CNAME websrv
shanghai.magedu.local. IN NS ns1.shanghai.magedu.local. shanghai.magedu.local. IN NS ns2.shanghai.magedu.local. zhengzhou.magedu.local. IN NS ns1.zhengzhou.magedu.local. zhengzhou.magedu.local. IN NS ns2.zhengzhou.magedu.local. ns1.shanghai.magedu.local. IN A 1.1.1.1 ns2.shanghai.magedu.local. IN A 1.1.1.2 ns1.zhengzhou.magedu.local. IN A 1.1.1.3 ns2.zhengzhou.magedu.local. IN A 1.1.1.4
$java -version java version "1.8.0_271" Java(TM) SE Runtime Environment (build 1.8.0_271-b09) Java HotSpot(TM) 64-Bit Server VM (build 25.271-b09, mixed mode)
(0 means use defaultstack size) [Sparc: 512;Solaris x86: 320 (was 256prior in 5.0 and earlier);Sparc 64 bit: 1024; Linuxamd64: 1024 (was 0 in 5.0and earlier); all others 0.]
$vim /usr/local/tomcat/bin/catalina.sh # OS specific support. $var _must_ be set to either true or false. # 添加以下配置,注意位置,如果添加在文件末尾,则无法生效 JAVA_OPTS="-Djava.rmi.server.hostname=10.0.0.71 -Dcom.sun.management.jmxremote.port=1100 -Dcom.sun.management.jmxremote.ssl=false -Dcom.sun.management.jmxremote.authenticate=false"
$systemctl restart tomcat.service
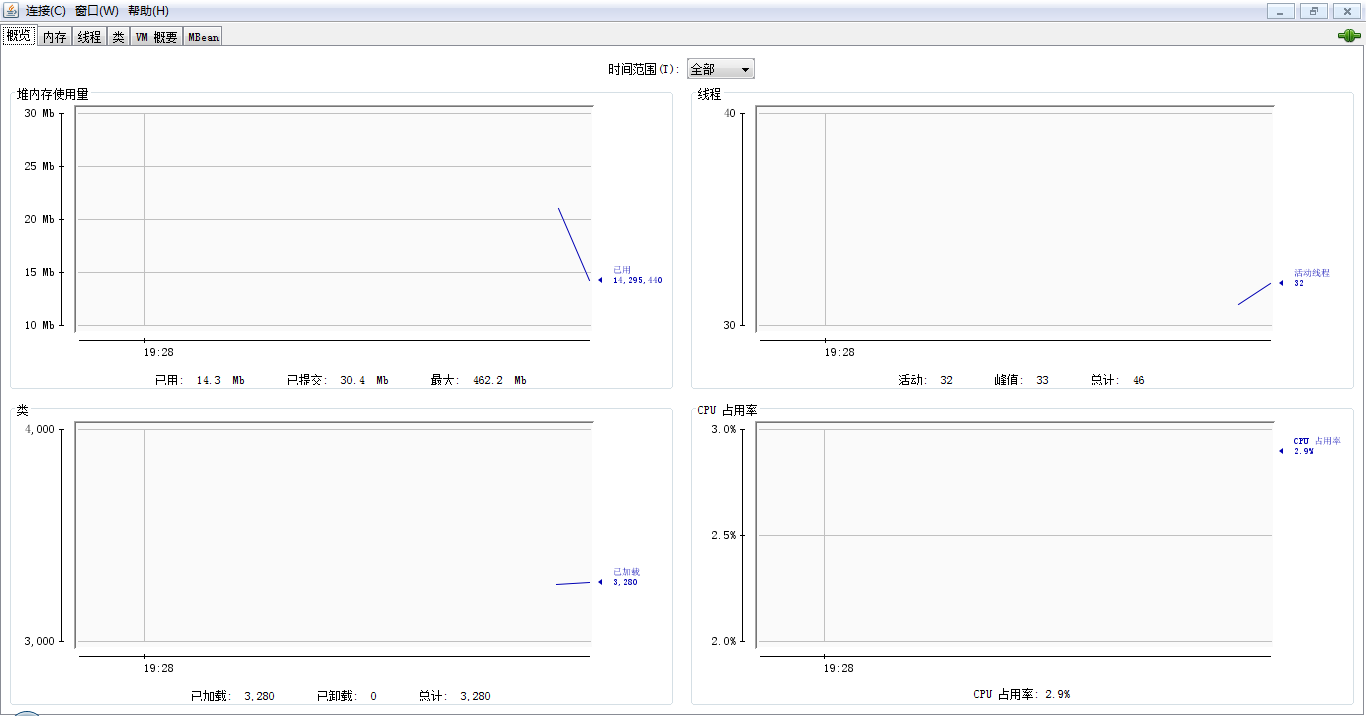
在 windows 上配置好 jdk,去 jdk/bin 目录下,启动 jconsole.exe
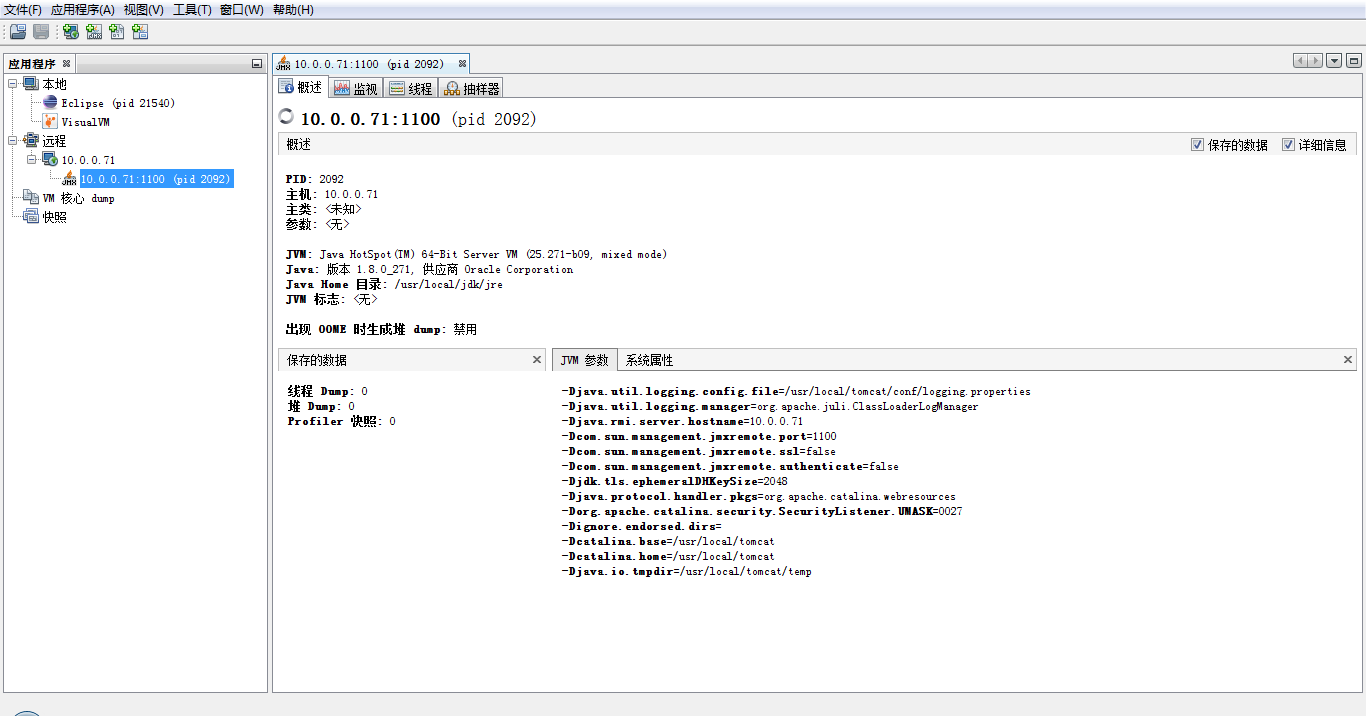
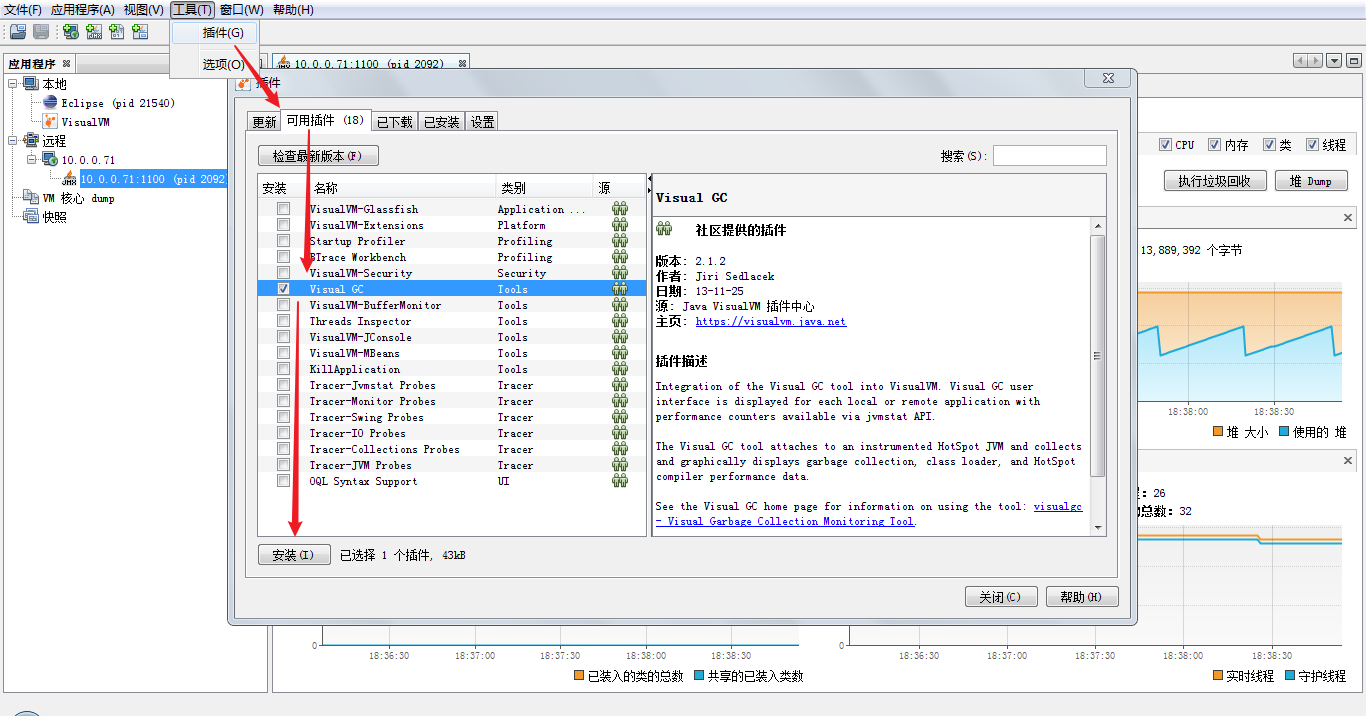
jvisualvm
监控 jvm 的图形化工具,可以本机监控,也可以远程监控,下面以远程监控为例:
配置 JMX,在服务器 10.0.0.71 上做如下配置
1 2 3 4 5 6
$vim /usr/local/tomcat/bin/catalina.sh # OS specific support. $var _must_ be set to either true or false. # 添加以下配置,注意位置,如果添加在文件末尾,则无法生效 JAVA_OPTS="-Djava.rmi.server.hostname=10.0.0.71 -Dcom.sun.management.jmxremote.port=1100 -Dcom.sun.management.jmxremote.ssl=false -Dcom.sun.management.jmxremote.authenticate=false"
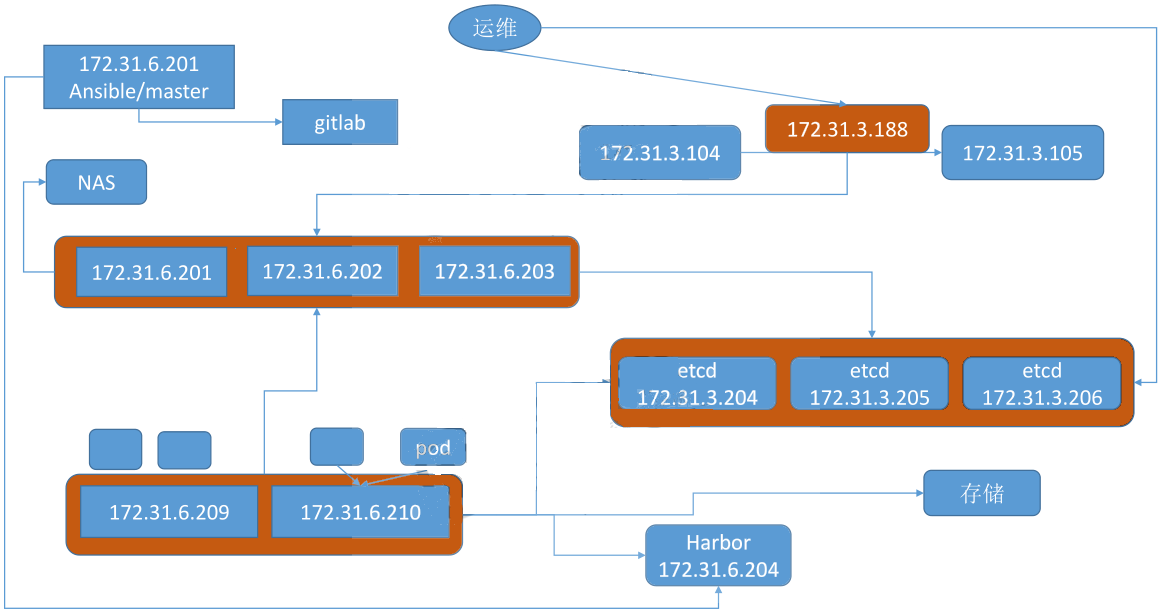
listen stats stats enable mode http bind 0.0.0.0:9999 log global stats uri /haproxy-status stats auth admin:123456
listen k8s-api-8443 bind 10.0.2.188:8443 # 注意,要和hosts的[ex-lb]对应起来 mode tcp server master1 10.0.1.1:6443 check inter 2000 fall 3 rise 5 # 6443端口是默认的,不能改 server master2 10.0.1.2:6443 check inter 2000 fall 3 rise 5
# 'etcd' cluster should have odd member(s) (1,3,5,...) # variable 'NODE_NAME' is the distinct name of a member in 'etcd' cluster [etcd] 10.0.2.1 NODE_NAME=etcd1 10.0.2.2 NODE_NAME=etcd2 10.0.2.3 NODE_NAME=etcd3
# master node(s) [kube-master] 10.0.1.1 10.0.1.2
# work node(s) [kube-node] 10.0.1.3 #10.0.1.4
# [optional] harbor server, a private docker registry # 'NEW_INSTALL': 'yes' to install a harbor server; 'no' to integrate with existed one # 'SELF_SIGNED_CERT': 'no' you need put files of certificates named harbor.pem and harbor-key.pem in directory 'down' [harbor] #192.168.1.8 HARBOR_DOMAIN="harbor.yourdomain.com" NEW_INSTALL=no SELF_SIGNED_CERT=yes
# [optional] loadbalance for accessing k8s from outside [ex-lb] 10.0.2.1 LB_ROLE=backup EX_APISERVER_VIP=10.0.2.188 EX_APISERVER_PORT=8443 10.0.2.2 LB_ROLE=master EX_APISERVER_VIP=10.0.2.188 EX_APISERVER_PORT=8443
# [optional] ntp server for the cluster [chrony] #192.168.1.1
# 示例 kubectl get pods kubectl get pods -A 相当于 kubectl get pods --all-namespaces kubectl get pods -o wide kubectl get replicationcontroller web kubectl get deployments.v1.apps -o json kubectl get -o json pod web-pod-13je7 kubectl get -f pod.yaml -o json kubectl get -k dir/ kubectl get -o template pod/web-pod-13je7 --template={{.status.phase}} kubectl get rc,services kubectl get rc/web service/frontend pods/web-pod-13je7
SUBCOMMAND: env# 更新环境变量,对应deployment的`spec.template.spec.containers.env` image # 更新镜像 resources Update resource requests/limits on objects with pod templates selector Set the selector on a resource serviceaccount Update ServiceAccount of a resource
1
2
3
4
5
6
7
kubectl set image (-f FILENAME | TYPE NAME) CONTAINER_NAME_1=CONTAINER_IMAGE_1 ... CONTAINER_NAME_N=CONTAINER_IMAGE_N [options]
# 示例 kubectl set image deployment/nginx busybox=busybox nginx=nginx:1.9.1 kubectl set image deployments,rc nginx=nginx:1.9.1 --all kubectl set image daemonset abc *=nginx:1.9.1 kubectl set image -f path/to/file.yaml nginx=nginx:1.9.1 --local -o yaml
describe 显示资源或资源组的详细信息 logs 打印pod中容器的日志(标准输出的日志) attach Attach to a running container exec 和docker的exec实现一样的功能,只是更加智能,不用考虑容器在哪个节点上 port-forward Forward one or more local ports to a pod proxy Run a proxy to the Kubernetes API server cp Copy files and directories to and from containers. auth Inspect authorization debug Create debugging sessions for troubleshooting workloads and nodes
# 示例: kubectl exec mypod -- date kubectl exec mypod -c ruby-container -- date kubectl exec mypod -c ruby-container -i -t -- bash -il kubectl exec mypod -i -t -- ls -t /usr kubectl exec deploy/mydeployment -- date kubectl exec svc/myservice -- date
注意:进入容器只是查看信息,不要修改配置,如果需要修改配置,只能重新打镜像
高级命令
1 2 3 4 5 6
diff Diff live version against would-be applied version apply Apply a configuration to a resource by filename or stdin patch Update field(s) of a resource replace Replace a resource by filename or stdin wait Experimental: Wait for a specific condition on one or many resources. kustomize Build a kustomization target from a directory or a remote url.
label Update the labels on a resource annotate Update the annotations on a resource completion Output shell completion code for the specified shell (bash or zsh)
api-resources 打印服务器上支持的API资源 api-versions 以 "group/version" 的形式打印API versions config Modify kubeconfig files plugin Provides utilities for interacting with plugins. version Print the client and server version information alpha convert options
安装内部的 DNS 服务(默认 CoreDNS),通过 Api Server 安装 kube-proxy 插件组件 请注意:就算部署了 DNS 服务,在安装 CNI 之前它也不会被调度到 node 上
alpha 相关,略…
1 2
kubeadm init [command] kubeadm init [flags]
command:
1
phase # 使用此命令调用init工作流的单个阶段
1 2 3 4 5 6 7 8 9 10 11 12 13 14 15 16
kubeadm init phase [command] # command: addon # Install required addons for passing Conformance tests bootstrap-token # Generates bootstrap tokens used to join a node to a cluster certs # Certificate generation control-plane # 生成建立控制平面所需的所有静态pod清单文件 etcd # Generate static Pod manifest file for local etcd kubeconfig # 生成建立控制平面所需的所有kubeconfig文件和管理kubeconfig文件 kubelet-finalize # Updates settings relevant to the kubelet after TLS bootstrap kubelet-start # Write kubelet settings and (re)start the kubelet mark-control-plane # Mark a node as a control-plane preflight # Run pre-flight checks upload-certs # Upload certificates to kubeadm-certs upload-config # Upload the kubeadm and kubelet configuration to a ConfigMap
preflight Run reset pre-flight checks update-cluster-status Remove this node from the ClusterStatus object. remove-etcd-member Remove a local etcd member. cleanup-node Run cleanup node.
1
2
kubeadm reset [command] kubeadm reset [flags]
command:
1
phase # 调用重置工作流的单个阶段
1 2 3 4 5 6
kubeadm reset phase [command] # command cleanup-node # Run cleanup node. preflight # Run reset pre-flight checks remove-etcd-member # Remove a local etcd member. update-cluster-status # Remove this node from the ClusterStatus object.
Alternatively, if you are the root user, you can run:
export KUBECONFIG=/etc/kubernetes/admin.conf
You should now deploy a pod network to the cluster. Run "kubectl apply -f [podnetwork].yaml" with one of the options listed at: https://kubernetes.io/docs/concepts/cluster-administration/addons/
Then you can join any number of worker nodes by running the following on each as root:
[root@master01 ~]$kubectl get nodes NAME STATUS ROLES AGE VERSION master01.ljk.cn Ready control-plane,master 53m v1.20.2 node01.ljk.cn Ready <none> 6m24s v1.20.2 node02.ljk.cn Ready <none> 10m v1.20.2
# 在每个节点上都生成一个flannel网卡,或者说是网络隧道,保障集群内部的通信 [root@master01 ~]$ip a # master ... 4: flannel.1: <BROADCAST,MULTICAST> mtu 1450 qdisc noop state DOWN group default link/ether 26:69:fd:2f:7a:3f brd ff:ff:ff:ff:ff:ff [root@node01 kubernetes]$ip a # node1 ... 4: flannel.1: <BROADCAST,MULTICAST> mtu 1450 qdisc noop state DOWN group default link/ether a2:74:d6:61:d5:5c brd ff:ff:ff:ff:ff:ff [root@node02 ~]$ip a # node2 ... 4: flannel.1: <BROADCAST,MULTICAST> mtu 1450 qdisc noop state DOWN group default link/ether fe:83:2b:fc:1e:01 brd ff:ff:ff:ff:ff:ff
Available Commands: apply Upgrade your Kubernetes cluster to the specified version diff Show what differences would be applied to existing static pod manifests. See also: kubeadm upgrade apply --dry-run node Upgrade commands for a node in the cluster plan Check which versions are available to upgrade to and validate whether your current cluster is upgradeable. To skip the internet check, pass in the optional [version] parameter
# 不需要https,注释以下内容 # https: # # https port for harbor, default is 443 # port: 443 # # The path of cert and key files for nginx # certificate: /your/certificate/path # private_key: /your/private/key/path
Commands: connect Connect a container to a network create Create a network disconnect Disconnect a container from a network inspect Display detailed information on one or more networks ls List networks prune Remove all unused networks rm Remove one or more networks
Options: --attachable Enable manual container attachment --aux-address map Auxiliary IPv4 or IPv6 addresses used by Network driver (default map[]) --config-from string The network from which copying the configuration --config-only Create a configuration only network -d, --driver string Driver to manage the Network (default "bridge") --gateway strings IPv4 or IPv6 Gateway for the master subnet --ingress Create swarm routing-mesh network --internal Restrict external access to the network --ip-range strings Allocate container ip from a sub-range --ipam-driver string IP Address Management Driver (default "default") --ipam-opt map Set IPAM driver specific options (default map[]) --ipv6 Enable IPv6 networking --label list Set metadata on a network -o, --opt map Set driver specific options (default map[]) --scope string Control the network's scope --subnet strings Subnet in CIDR format that represents a network segment
Options: --alias strings Add network-scoped aliasfor the container --driver-opt strings driver options for the network --ip string IPv4 address (e.g., 172.30.100.104) --ip6 string IPv6 address (e.g., 2001:db8::33) --link list Add link to another container --link-local-ip strings Add a link-local address for the container
Commands: create Create a volume inspect Display detailed information on one or more volumes ls List volumes prune Remove all unused local volumes rm Remove one or more volumes