数据类型 变量与常量 C 语言的常量可以分为直接常量 和符号常量 ,符号常量一般习惯使用大写字母:
宏定义 define 示例:
define 和 const 的区别
define 是宏定义,程序在预处理阶段将用 define 定义的内容进行了 替换 。因此在程序运行时,常量表中并没有用 define 定义的常量,系统不为它分配内存。
而 const 定义的常量,在程序运行时,存在常量表中,且系统为它分配内存。
define 定义的常量,预处理时只是直接进行了替换,因此在编译时不能进行数据类型检验。
而 const 定义的常量,在编译时进行严格的类型检验,可以避免出错。
define 定义表达式时要注意“边缘效应” ,例如:
1 2 3 4 5 6 7 8 9 #define N 1+2 float a = N/2.0 ;
用 define 定义函数 示例:
1 2 3 4 5 6 7 8 9 #include <stdio.h> #define LEN(x) sizeof(x) / sizeof(x[0]) int main () { int arr[] = {0 , 1 , 2 , 3 , 4 , 5 , 6 , 7 , 8 , 9 }; for (int i = 0 , l = LEN(arr); i < l; i++) { printf ("%d\n" , arr[i]); } return 0 ; }
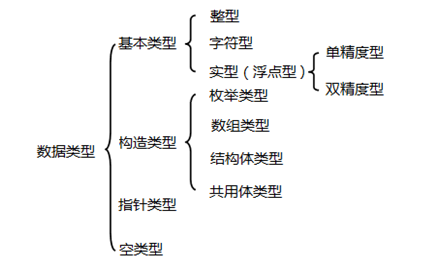
基本数据类型
注:int、short int、long int 是根据编译环境的不同,所取范围不同。而其中 short int 和 long int 至少是表中所写范围,但是 int 在表中是以 16 位编译环境写的取值范围。另外 c 语言 int 的取值范围在于他占用的字节数 ,不同的编译器,规定是不一样。ANSI 标准定义 int 是占 2 个字节,TC 是按 ANSI 标准的,它的 int 是占 2 个字节的。但是在 VC 里,一个 int 是占 4 个字节的。
整型
short:两个字节,16 位,2^16
unsigned short:第一位是符号位,-2^15 - 2^15
int:4 个字节,32 位,2^32
long:8 个字节,64 位
浮点
字符
char:c++有 string 类型,c 没有 string 类型,c 中表示字符串可以使用字符数组或者字符字符指针。
void:对类型不关心,不敏感
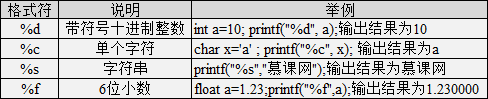
格式化输出 printf
%d:带符号十进制整数
%c:单个字符
%s:字符串
%f:6 位小数
自动类型转换 自动转换发生在不同数据类型运算时,在编译的时候自动完成 。自动转换遵循的规则就好比小盒子可以放进大盒子里面一样,下图表示了类型自动转换的规则。
char 类型数据转换为 int 类型数据遵循 ASCII 码中的对应值,ASCII 参考:http://c.biancheng.net/c/ascii/
注:字节小的可以向字节大的自动转换,但字节大的不能向字节小的自动转换
强制类型转换 强制类型转换是通过定义类型转换运算来实现的。其一般形式为:
其作用是把表达式的运算结果强制转换成类型说明符所表示的类型,例如:
1 2 3 4 5 6 7 8 9 10 11 #include <stdio.h> int main (int argc, const char *argv[]) { float a = 6.77 ; int b = (int )a; printf ("%d\n" , b); return 0 ; }
转换为 go:
1 2 3 4 5 6 7 8 9 10 11 package mainimport "fmt" func main () var a float32 = 6.77 var b int = int (a) fmt.Println(b) }
转换后不会改变原数据的类型及变量值,只在本次运算中临时性转换 。
强制转换后的运算结果不遵循四舍五入原则 。
C 语言关键字 32 个:
auto:声明自动变量
short:声明短整型变量或函数
int:声明整型变量或函数
long :声明长整型变量或函数
float:声明浮点型变量或函数
double:声明双精度变量或函数
char:声明字符型变量或函数
struct:声明结构体变量或函数
union:声明共用数据类型
enum:声明枚举类型
typedef:用以给数据类型取别名
const:声明只读变量
unsigned:声明无符号类型变量或函数
signed:声明有符号类型变量或函数
extern:声明变量是在其他文件正声明
register:声明寄存器变量
static:声明静态变量
volatile:说明变量在程序执行中可被隐含地改变
void:声明函数无返回值或无参数,声明无类型指针
if:条件语句
else:条件语句否定分支(与 if 连用)
switch:用于开关语句 case:开关语句分支
for:一种循环语句
do:循环语句的循环体
while:循环语句的循环条件
goto:无条件跳转语句
continue:结束当前循环,开始下一轮循环
break:跳出当前循环
default:开关语句中的“其他”分支
sizeof:计算数据类型长度
return:子程序返回语句(可以带参数,也可不带参数)循环条件
1999 年 12 月 16 日,ISO 推出了 C99 标准,该标准新增了 5 个 C 语言关键字:
inline
restrict
_Bool
_Complex
_Imaginary
2011 年 12 月 8 日,ISO 发布 C 语言的新标准 C11,该标准新增了 7 个 C 语言关键字:
_Alignas
_Alignof
_Atomic
_Static_assert
_Noreturn
_Thread_local
_Generic
运算符
算术运算符
赋值运算符
关系运算符
逻辑运算符
三目运算符
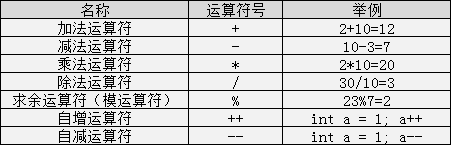
算术运算符
除法运算中注意:
如果相除的两个数都是整数 的话,则结果也为整数 ,小数部分省略,如 8/3 = 2;而两数中有一个为小数 ,结果则为小数 ,如:9.0/2 = 4.500000。
取余运算中注意:
该运算只适合用两个整数 进行取余运算,如:10%3 = 1;而 10.0%3 则是错误的;运算后的符号取决于被模数的符号,如(-10)%3 = -1;而 10%(-3) = 1。
注:C 语言中没有乘方这个运算符,也不能用 ×,÷ 等算术符号。
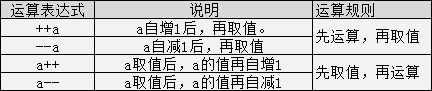
自增与自减运算符 自增运算符为“++”,其功能是使变量的值自增 1;自减运算符为“–”,其功能是使变量值自减 1。它们经常使用在循环中。自增自减运算符有以下几种形式:
注意:无论是 a++还是++a 都等同于 a=a+1,在表达式执行完毕后 a 的值都自增了 1,无论是 a–还是–a 都等同于 a=a-1,在表达式执行完毕后 a 的值都自减少 1。
赋值运算符 C 语言中赋值运算符分为简单赋值运算符 和复合赋值运算符 ,之前我们已经接触过简单赋值运算符“=”号了,下面讲一下复合赋值运算符:
复合赋值运算符就是在简单赋值符“=”之前加上其它运算符构成,例如+=、-=、*=、/=、%=。
关系运算符
关系表达式的值是“真”和“假”,在 C 程序用整数 1 和 0 表示。
逻辑运算符 在数学中我们见过 7<x<100 这样的公式,意思是 x 大于 7 并且 x 小于 100。
在程序中这样写一个变量的范围值是不行的,计算机是看不懂这样的算式的,那么怎样让计算机看懂呢?这里就要用到逻辑运算符了。
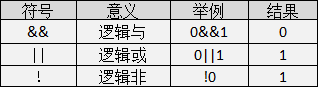
逻辑运算的值也是有两种分别为“真”和“假”,C 语言中用整型的 1 和 0 来表示。其求值规则如下:
与运算(&&)
参与运算的两个变量都为真 时,结果才为真 ,否则为假。例如:5>=5 && 7>5 ,运算结果为真;
或运算(||)
参与运算的两个变量只要有一个为真 ,结果就为真 。 两个量都为假时,结果为假。例如:5>=5||5>8,运算结果为真;
非运算(!)
参与运算的变量为真时 ,结果为假 ;参与运算量为假时 ,结果为真 。例如:!(5>8),运算结果为真。
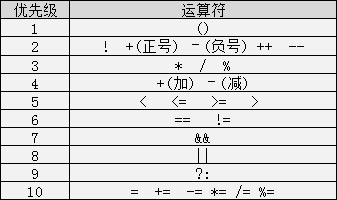
三目运算符 运算符 优先级
没必要去死记运算符的优先级顺序,记住最高优先级是()就可以了。
结构语句 分支结构 if / if-else 简单 if 简单 if-else 语句 1 2 3 4 5 6 7 8 if (表达式){ 执行代码块1 ; } else { 执行代码块2 ; }
多重 if-else 语句 1 2 3 4 5 6 7 8 9 10 11 12 13 if (表达式1 ){ 执行代码块1 ; } else if (表达式2 ){ 执行代码块2 ; } ... else { 执行代码块3 ; }
循环结构 while / do-while while 使用 while 语句应注意以下几点:
while 语句中的表达式一般是关系表达或逻辑表达式 ,当表达式的值为假时不执行循环体,反之则循环体一直执行。
一定要记着在循环体中改变循环变量的值 ,否则会出现死循环(无休止的执行)。
循环体如果包括有一个以上的语句,则必须用{}括起来 ,组成复合语句。
do-while 1 2 3 4 do { 执行代码块; }while (表达式)
do-while 循环语句的语义是:它先执行循环中的执行代码块,然后再判断 while 中表达式是否为真,如果为真则继续循环;如果为假,则终止循环。因此,do-while 循环至少要执行一次循环语句 。
循环结构 for 1 2 3 4 for (表达式1 ; 表达式2 ; 表达式3 ){ 执行代码块; }
在 for 循环中,表达式 1 是一个或多个赋值语句 ,它用来控制变量的初始值 ;表达式 2 是一个关系表达式 ,它决定什么时候退出循环;表达式 3 是循环变量的步进值 ,定义控制循环变量每循环一次后按什么方式变化。这三部分之间用分号(;)分开 。
使用 for 语句应该注意 :
for 循环中的“表达式 1、2、3”均可可以缺省,但分号(;)不能缺省 。
省略“表达式 1(循环变量赋初值)”,表示不对循环变量赋初始值 。如:
1 2 3 4 5 int i = 1 ;for (; i<=10 ; i++){ printf ("第%d遍书写: computer\n" , i); }
省略“表达式 2(循环条件)”,不做其它处理,循环一直执行(死循环) 。如:
1 2 3 4 for (int i=0 ; ; i++){ printf ("第%d遍书写: computer\n" , i); }
省略“表达式 3(循环变量增量)”,不做其他处理,循环一直执行(死循环) 。如:
1 2 3 4 for (int i=0 ; i<=10 ;) { printf ("第%d遍书写: computer\n" , i); }
注:死循环可以使用后面即将讲到的 break 解决
表达式 1 可以是设置循环变量的初值的赋值表达式,也可以是其他表达式 。如:
1 2 3 4 5 6 7 int sum, num;num = 0 ; for (sum = 0 ; num<=10 ; num++){ sum += num; }
表达式 1 和表达式 3 可以是一个简单表达式也可以是多个表达式以逗号分割 。如:
1 2 3 4 for (int sum = 0 , num = 0 ; num <= 3 ; num++, sum++) { sum += num; printf ("num=%d,sum=%d\n" , num, sum); }
表达式 2 一般是关系表达式或逻辑表达式 ,但也可是数值表达式或字符表达式 ,只要其值非零 ,就执行循环体。
1 2 3 4 5 for (int sum=0 ,num=0 ; num<=3 && sum<=5 && 1 ; num++, sum++){ sum += num; printf ("num=%d,sum=%d\n" , num, sum); }
循环中的 break 与 continue break 用于结束循环,continue 用于跳过本次循环。
注:在多层循环中,一个break 语句只跳出当前循环 。
分支结构 switch 1 2 3 4 5 6 switch (表达式){ case 常量表达式1 :执行代码块1 break ; ... case 常量表达式n:执行代码块n break ; default : 执行代码块n+1 ; }
注意:
在 case 子句后如果没有 break;会一直往后执行一直到遇到 break;才会跳出 switch 语句。
switch 后面的表达式语句只能是整型或者字符类型 。
在 case 后,允许有多个语句 ,可以不用{}括起来。
各 case 和 default 子句的先后顺序可以变动,而不会影响程序执行结果。
default 子句可以省略不用。
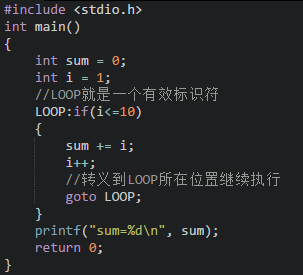
goto 语句 语句标号是一个标识符,该标识符一般用英文大写并遵守标识符命名规则,这个标识符加上一个“:”一起出现在函数内某处,执行 goto 语句后,程序将跳转到该标号处并执行其后的语句。
示例:用 goto 语句和 if 语句构成循环求 10 以内的数之和。
应用场景:深层循环嵌套,调到循环外面需要多个 break,但是仅仅使用一次 goto 语句就可以实现。
1 2 3 4 5 6 7 8 9 10 11 12 13 14 15 16 17 for (){ for () { for () { if (disaster) { goto error; } } } } error: if (disaster) {}
函数 C 语言提供了大量的库函数,比如 stdio.h 提供输出函数,但是还是满足不了我们开发中的一些逻辑,所以这个时候需要自己定义函数,自定义函数的一般形式:
1 2 3 4 5 [数据类型] 函数名称([参数]) { 执行代码块; return (表达式); }
注意:
数据类型默认 int
自定义函数尽量放在 main 函数之前,如果要放在 main 函数之后的话,需要在 mian 函数之前声明自定义函数,声明格式为:
示例:
1 2 3 4 5 6 7 8 9 10 11 12 13 14 15 16 17 18 19 20 21 22 #include <stdio.h> int sayLove () ;int sayHello () { printf ("hello word\n" ); return 0 ; } int main () { sayHello(); sayLove(); return 0 ; } int sayLove () { printf ("i love u\n" ); return 0 ; }
内部函数与外部函数 在 C 语言中不能被其他源文件调用的函数称谓内部函数 ,内部函数由 static 关键字来定义,因此又被称谓静态函数,形式为:
1 static [returnType] funcName([params])
外部函数使用 extern 关键字修饰,可以省略。
数组 声明:
1 itemType arrayName[length]
初始化:
1 2 itemType arrayName[n] = {item1, item2...,itemn} itemType arrayName[] = {item1, item2...,itemn}
数组的下标均以 0 开始;
数组在初始化的时候,数组内元素的个数不能大于声明的数组长度;
如果采用第一种初始化方式,元素个数小于数组的长度时,多余的数组元素初始化为 0;
数组的遍历 只能使用 for 遍历,注意 c 语言没有提供计算数组长度的方法
1 2 3 4 5 6 7 8 9 10 #include <stdio.h> #define LEN(x) sizeof(x) / sizeof(x[0]) int main () { int arr[] = {0 , 1 , 2 , 3 , 4 , 5 , 6 , 7 , 8 , 9 }; for (int i = 0 , l = LEN(arr); i < l; i++) { printf ("%d\n" , arr[i]); } return 0 ; }
数组作为函数参数 1 2 3 4 5 6 7 8 9 10 11 12 13 14 #include <stdio.h> #define LEN(x) sizeof(x) / sizeof(x[0]) void tmp (int arr[], int len) { for (int i = 0 , l = len; i < l; ++i) { printf ("%d\n" , arr[i]); } } int main () { int arr[] = {0 , 1 , 2 , 3 , 4 , 5 , 6 , 7 , 8 , 9 }; tmp(arr, LEN(arr)); return 0 ; }
注意:
形参可以指定长度,也可以不指定
数组作为参数传递,传递的是指针,所以:
不能通过 sizeof 求长度
如果修改,是通过指针修改,会修改数组本身
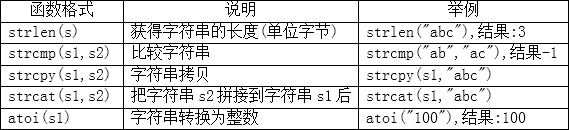
字符串函数
strlen strlen()获取字符串的长度,在字符串长度中是不包括‘\0’而且汉字和字母的长度是不一样的。
strcmp strcmp()在比较的时候会把字符串先转换成 ASCII 码 再进行比较,返回的结果为0 表示 s1 和 s2 的 ASCII 码相等 ,返回结果为1 表示 s1 比 s2 的 ASCII 码大 ,返回结果为**-1 表示 s1 比 s2 的 ASCII 码小**。
strcpy strcpy()拷贝之后会覆盖原来字符串且不能对字符串常量进行拷贝。
1 2 3 4 5 6 7 8 9 #include <stdio.h> #include <string.h> int main () { char str[] = "hello" ; strcpy (str, "word" ); printf ("%s" , str); return 0 ; }
strcat 拼接字符串,strcat 在使用时 s1 与 s2 指的内存空间不能重叠,且 s1 要有足够的空间来容纳要复制的字符串。
1 2 3 4 5 6 7 8 9 10 11 12 #include <stdio.h> #include <string.h> int main () { char s1[] = "hello " ; char s2[] = "word" ; char s[strlen (s1) + strlen (s2)]; strcpy (s, s1); strcat (s, s2); printf ("%s" , s); return 0 ; }
多维数组


 代码实现如下:
 代码实现如下:
 代码实现如下: