Could not attach to process. If your uid matches the uid of the target process, check the setting of /proc/sys/kernel/yama/ptrace_scope, or try again as the root user. For more details, see /etc/sysctl.d/10-ptrace.conf ptrace: Operation not permitted.
info breakpoints Num Type Disp Enb Address What 1 breakpoint keep y 0x00000000004005fc in printNum2 at test.c:17 breakpoint already hit 1 time 2 hw watchpoint keep y a breakpoint already hit 1 time ignore next 3 hits
/*gdbStep.c*/ #include<stdio.h> /*计算简单乘法,这里没有考虑溢出*/ int add(int a, int b) { int c = a + b; return c; } /*打印从0到num-1的数*/ int count(int num) { int i = 0; if(0 > num) return 0; while(i < num) { printf("%d\n",i); i++; } return i; } int main(void) { int a = 3; int b = 7; printf("it will calc a + b\n"); int c = add(a,b); printf("%d + %d = %d\n",a,b,c); count(c); return 0; }
(gdb) list 1 #include<stdio.h> 2 3 /*计算简单乘法,这里没有考虑溢出*/ 4 int add(int a, int b) 5 { 6 int c = a * b; 7 return c; 8 } 9 int main(void) 10 { (gdb) l 11 int a = 13; 12 int b = 57; 13 printf("it will calc a * b\n"); 14 int c = add(a,b); 15 printf("%d*%d = %d\n",a,b,c); 16 return 0; 17 } (gdb)
单步执行-next
next 命令(可简写为 n)用于在程序断住后,继续执行下一条语句,假设已经启动调试,并在第 12 行停住,如果要继续执行,则使用 n 执行下一条语句,如果后面跟上数字 num,则表示执行该命令 num 次,就达到继续执行 n 行的效果了:
1 2 3 4 5 6 7 8 9 10 11
$ gdb gdbStep #启动调试 (gdb)b 25 #将断点设置在12行 (gdb)run #运行程序 Breakpoint 1, main () at gdbStep.c:25 25 int b = 7; (gdb) n #单步执行 26 printf("it will calc a + b\n"); (gdb) n 2 #执行两次 it will calc a + b 28 printf("%d + %d = %d\n",a,b,c); (gdb)
从上面的执行结果可以看到,我们在 25 行处断住,执行 n 之后,运行到 26 行,运行 n 2 之后,运行到 28 行,但是有没有发现一个问题,为什么不会进入到 add 函数内部呢?那就需要用到另外一个命令啦。
$ gdb gdbStep #启动调试 (gdb) b 25 #在12行设置断点 Breakpoint 1 at 0x4005d3: file gdbStep.c, line 25. (gdb) run #运行程序 Breakpoint 1, main () at gdbStep.c:25 25 int b = 7; (gdb) s 26 printf("it will calc a + b\n"); (gdb) s #单步进入,但是并没有该函数的源文件信息 _IO_puts (str=0x4006b8 "it will calc a + b") at ioputs.c:33 33 ioputs.c: No such file or directory. (gdb) finish #继续完成该函数调用 Run till exit from #0 _IO_puts (str=0x4006b8 "it will calc a + b") at ioputs.c:33 it will calc a + b main () at gdbStep.c:27 27 int c = add(a,b); Value returned is $1 = 19 (gdb) s #单步进入,现在已经进入到了add函数内部 add (a=13, b=57) at gdbStep.c:6 6 int c = a + b;
从上面的过程可以看到,s 命令会尝试进入函数,但是如果没有该函数源码,需要跳过该函数执行,可使用 finish 命令,继续后面的执行。如果没有函数调用,s 的作用与 n 的作用并无差别,仅仅是继续执行下一行。它后面也可以跟数字,表明要执行的次数。
Breakpoint 1, count (num=10) at gdbStep.c:18 18 i++; (gdb) c 3 #跳过三次 Will ignore next 2 crossings of breakpoint 1. Continuing. 3 4 5
Breakpoint 1, count (num=10) at gdbStep.c:18 18 i++;
继续运行到指定位置-until
假如我们在 25 行停住了,现在想要运行到 29 行停住,就可以使用 until 命令(可简写为 u):
1 2 3 4 5 6 7 8 9
$ gdb gdbStep (gdb)b 25 (gdb)run (gdb) u 29 it will calc a + b 3 + 7 = 10 main () at gdbStep.c:29 29 count(c); (gdb)
可以看到,在执行 u 29 之后,它在 29 行停住了。它利用的是临时断点。
跳过执行—skip
skip 可以在 step 时跳过一些不想关注的函数或者某个文件的代码:
1 2 3 4 5 6 7 8 9 10 11 12 13 14 15 16 17
$ gdb gdbStep (gdb) b 27 Breakpoint 1 at 0x4005e4: file gdbStep.c, line 27. (gdb) skip function add #step时跳过add函数 Function add will be skipped when stepping. (gdb) info skip #查看step情况 Num Type Enb What 1 function y add (gdb) run Starting program: /home/hyb/workspaces/gdb/gdbStep it will calc a + b
Breakpoint 1, main() at gdbStep.c:27 27 int c = add(a,b); (gdb) s 28printf("%d + %d = %d\n",a,b,c); (gdb)
void printNum1(int n) { if( n < 0) return; int i = 1; while(i <= n) { printf("%d\n",i); i++; } }
编译运行:
1 2 3 4 5 6 7 8 9 10 11 12 13 14 15 16 17
$ gcc -g -o main main.c test.c $ chmod +x main $ ./main it will print from 5 to 1 5 4 3 2 1 print end it will print 1 to 5 1 2 3 4 5 print end
程序功能比较简单,用来打印 5 到 1 的数以及 1 到 5 的数,这里也就不多做解释。
列出源码
首先要介绍的就是 list 命令(可简写为 l),它用来打印源码。
直接打印源码
例如:
1 2 3 4 5 6 7 8 9 10 11 12 13
$ gdb main (gdb) l 1 //main.c 2 #include<stdio.h> 3 #include"test.h" 4 int main(void) 5 { 6 printf("it will print from 5 to 1\n"); 7 printNum(5); 8 printf("print end\n"); 9 10 printf("it will print 1 to 5\n"); (gdb)
直接输入 l 可从第一行开始显示源码,继续输入 l,可列出后面的源码。后面也可以跟上+或者-,分别表示要列出上一次列出源码的后面部分或者前面部分。
列出指定行附近源码
l 后面可以跟行号,表明要列出附近的源码:
1 2 3 4 5 6 7 8 9 10 11
(gdb) l 9 4 int main(void) 5 { 6 printf("it will print from 5 to 1\n"); 7 printNum(5); 8 printf("print end\n"); 9 10 printf("it will print 1 to 5\n"); 11 printNum1(5); 12 printf("print end\n"); 13 return 0;
(gdb) l 1 main.c: No such file or directory. (gdb)
它就会提示找不到源码文件了,那么怎么办呢? 我们可以使用 dir 命名指定源码路径,例如:
1 2
(gdb) dir ./temp Source directories searched: /home/hyb/workspaces/gdb/sourceCode/./temp:$cdir:$cwd
这个时候它就能找到源码路径了。我这里使用的是相对路径,保险起见,你也可以使用绝对路径。
更换源码目录
例如,你编译好的程序文件,放到了另外一台机器上进行调试,或者你的源码文件全都移动到了另外一个目录,怎么办呢?当然你还可以使用前面的方法添加源码搜索路径,也可以使用 set substitute-path from to 将原来的路径替换为新的路径,那么我们如何知道原来的源码路径是什么呢?借助 readelf 命令可以知道:
1 2 3 4 5 6
$ readelf main -p .debug_str [ 0] long unsigned int [ 12] short int [ 1c] /home/hyb/workspaces/gdb/sourceCode [ 40] main.c (显示部分内容)
main 为你将要调试的程序名,这里我们可以看到原来的路径,那么我们现在替换掉它:
1 2 3 4 5
(gdb) set substitute-path /home/hyb/workspaces/gdb/sourceCode /home/hyb/workspaces/gdb/sourceCode/temp (gdb) show substitute-path List of all source path substitution rules: `/home/hyb/workspaces/gdb/sourceCode' -> `/home/hyb/workspaces/gdb/sourceCode/temp'. (gdb)
设置完成后,可以通过 show substitute-path 来查看设置结果。这样它也能在正确的路径查找源码啦。
$ whereis vim vim: /usr/bin/vim /usr/bin/vim.tiny /usr/bin/vim.basic /usr/bin/vim.gnome /etc/vim /usr/share/vim /usr/share/man/man1/vim.1.gz $ which vim /usr/bin/vim
[root@centos8 src]$cd nftables-0.9.6/ [root@centos8 nftables-0.9.6]$ [root@centos8 nftables-0.9.6]$mkdir /usr/local/nftables [root@centos8 src]$yum -y install gcc [root@centos8 nftables-0.9.6]$./configure --prefix=/usr/local/nftables ... # 报错,缺少libmnl依赖 checking for LIBMNL... no configure: error: Package requirements (libmnl >= 1.0.4) were not met: .... # 安装libmnl参考:https://centos.pkgs.org/8/centos-baseos-x86_64/libmnl-1.0.4-6.el8.x86_64.rpm.html [root@centos8 nftables-0.9.6]$dnf install libmnl # 安装libmnl-devel参考:https://centos.pkgs.org/8/centos-powertools-x86_64/libmnl-devel-1.0.4-6.el8.x86_64.rpm.html [root@centos8 nftables-0.9.6]$dnf --enablerepo=PowerTools install libmnl-devel [root@centos8 nftables-0.9.6]$ldconfig [root@centos8 nftables-0.9.6]$./configure --prefix=/usr/local/nftables ... # 报错,缺少libnftnl依赖 checking for LIBNFTNL... no configure: error: Package requirements (libnftnl >= 1.1.7) were not met:
No package 'libnftnl' found
Consider adjusting the PKG_CONFIG_PATH environment variable if you installed software in a non-standard prefix.
Alternatively, you may set the environment variables LIBNFTNL_CFLAGS and LIBNFTNL_LIBS to avoid the need to call pkg-config. See the pkg-config man page for more details. ... # 上面的libmnl通过dnf安装,这个libnftnl就通过编译安装吧,从nftables官网下载最新的libnftnl源码包 [root@centos8 nftables-0.9.6]$cd .. [root@centos8 src]$tar jxvf libnftnl-1.1.7.tar.bz2 [root@centos8 src]$cd libnftnl-1.1.7/ [root@centos8 libnftnl-1.1.7]$./configure --prefix=/usr/local/libnftnl-1.1.7 [root@centos8 libnftnl-1.1.7]$make && make install ... # 根据提示,要指定libnftnl的lib和include,这个要查看具体的pkg-config文件 # vim /usr/local/libnftnl-1.1.7/lib/pkgconfig/libnftnl.pc # ... # 15 Libs: -L${libdir} -lnftnl # 16 Cflags: -I${includedir} [root@centos8 nftables-0.9.6]$(LIBNFTNL_CFLAGS=-I/usr/local/libnftnl-1.1.7/include/ LIBNFTNL_LIBS="-L/usr/local/libnftnl-1.1.7/lib/ -lnftnl" ./configure --prefix=/usr/local/nftables) ... # 报错,缺少libgmb依赖 checking for __gmpz_init in -lgmp... no configure: error: No suitable version of libgmp found [root@centos8 nftables-0.9.6]$yum -y install gmp gmp-devel # 继续 [root@centos8 nftables-0.9.6]$./configure --prefix=/usr/local/nftables ... # 缺少 libreadline 依赖 checking for readline in -lreadline... no configure: error: No suitable version of libreadline found [root@centos8 nftables-0.9.6]$dnf -y install readline readline-devel [root@centos8 nftables-0.9.6]$./configure --prefix=/usr/local/nftables # 安装成功 nft configuration: cli support: readline enable debugging symbols: yes use mini-gmp: no enable man page: yes libxtables support: no json output support: no enable Python: no
# 添加一个 IPv4 的 foo 表 nft add table ip foo # 添加一个 IPv6 的 bar 表 nft add table ip6 bar
列出表
1 2 3 4 5 6 7 8 9 10 11
# 列出所有表 [root@centos8 ~]$nft list tables table ip foo table ip6 bar # 列出一个或多个地址族的所有表,注意这时是tables [root@centos8 ~]$nft list tables ip table ip foo # 列出一个表中的所有链 [root@centos8 ~]$nft list table ip foo table ip foo { # 目前表中还没链 }
删除表
1
[root@centos8 ~]$nft delete table ip6 bar
说明:内核 3.18 以前,需要先清空表中的内容,再删除表
清空表
1 2
# 清空表中所有链中的所有规则 [root@centos8 ~]$nft flush table ip foo
ip protocol tcp ip protocol 6 ip protocol != tcp ip protocol { icmp, esp, ah, comp, udp, udplite, tcp, dccp, sctp }
saddr :Source IP Address
1
2
3
4
5
6
7
ip saddr 192.168.2.0/24 ip saddr != 192.168.2.0/24 ip saddr 192.168.3.1 ip daddr 192.168.3.100 ip saddr != 1.1.1.1 ip saddr 1.1.1.1 ip saddr & 0xff == 1 ip saddr & 0.0.0.255 < 0.0.0.127
daddr :Destination IP Address
1 2 3 4 5 6 7 8 9 10
ip daddr 192.168.0.1 ip daddr != 192.168.0.1 ip daddr 192.168.0.1-192.168.0.250 ip daddr 10.0.0.0-10.255.255.255 ip daddr 172.16.0.0-172.31.255.255 ip daddr 192.168.3.1-192.168.4.250 ip daddr != 192.168.0.1-192.168.0.250 ip daddr { 192.168.0.1-192.168.0.250 } ip daddr { 192.168.5.1, 192.168.5.2, 192.168.5.3 }
reject reject with icmp type host-unreachable reject with icmp type net-unreachable reject with icmp type prot-unreachable reject with icmp type port-unreachable reject with icmp type net-prohibited reject with icmp type host-prohibited reject with icmp type admin-prohibited reject with icmpv6 type no-route reject with icmpv6 type admin-prohibited reject with icmpv6 type addr-unreachable reject with icmpv6 type port-unreachable reject with icmpx type host-unreachable reject with icmpx type no-route reject with icmpx type admin-prohibited reject with icmpx type port-unreachable ip protocol tcp reject with tcp reset
OPTIONS [--pool] <string> pool name [--name] <string> name of the volume [--capacity] <string> size of the vol, as scaled integer (default bytes) --allocation <string> initial allocation size, as scaled integer (default bytes) --format <string> file format type raw,bochs,qcow,qcow2,qed,vmdk --backing-vol <string> the backing volume if taking a snapshot --backing-vol-format <string> format of backing volume if taking a snapshot --prealloc-metadata preallocate metadata (for qcow2 instead of full allocation) --print-xml print XML document, but don't define/create
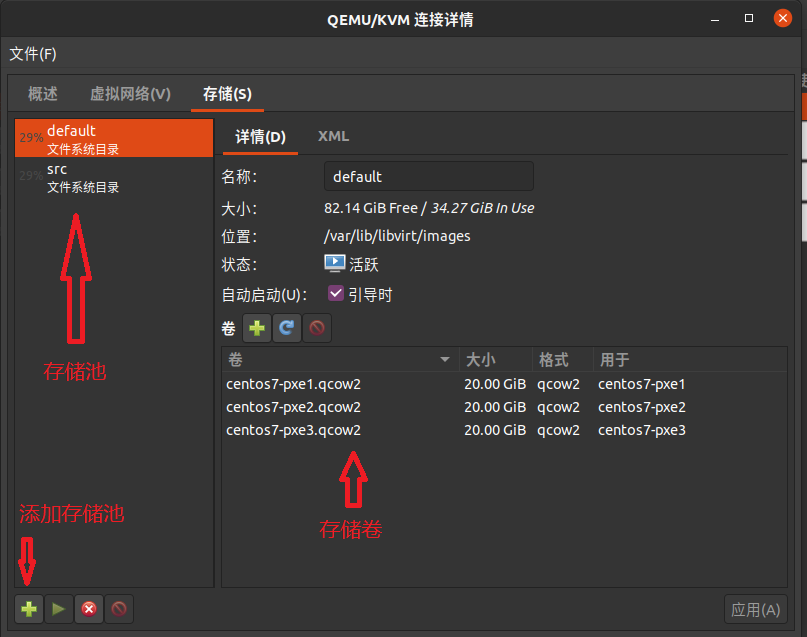
基于文件系统的存储池,创建其中的存储卷,可以使用 touch、mkdir、qemu-img create等命令,这些命令只能创建特定的存储卷,例如touch创建 raw 格式的文件,mkdir创建目录,qemu-img create创建磁盘镜像。
基于磁盘的存储池,创建其中的存储卷,也有对应命令,例如 disk 格式的存储池,使用fdisk创建分区;logical 格式的存储池,使用lvcreate,等等
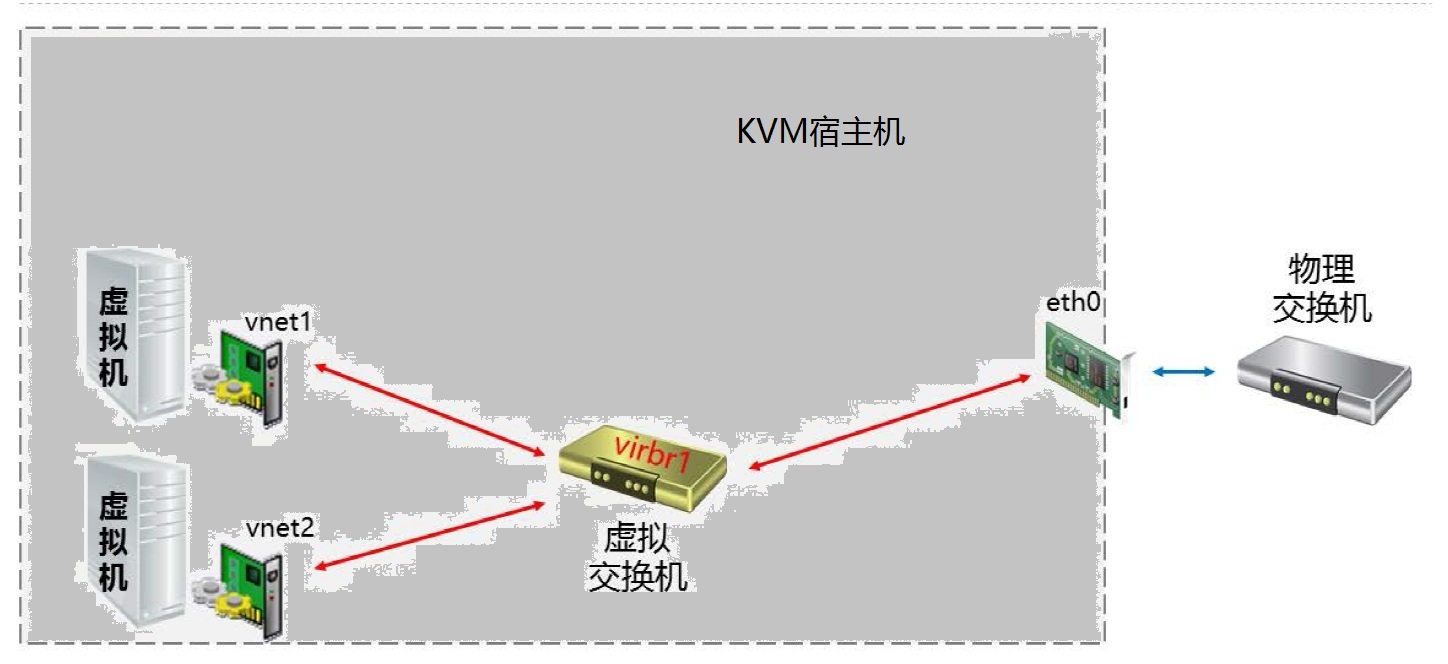
#加入物理网卡 nmcli con add type bridge-slave con-name br0-port0 ifname eth0 master br0 nmcli con add type bridge-slave con-name br0-port1 ifname eth1 master br0 nmcli connection reload nmcli con up br0-port0 nmcli con up br0-port1
Virtual users is a simple mechanism to store a list of users, with their password, name, uid, directory, etc. It’s just like /etc/passwd. But it’s not /etc/passwd. It’s a different file, only for FTP. It means that you can easily create FTP-only accounts without messing your system accounts. Additionnaly, virtual users files can store individual quotas, ratios, bandwidth, etc. System accounts can’t do this. Thousands of virtual users can share the same system user, as long as they all are chrooted, and they have their own home directory.
pure-pwconvert
Generate a virtual users file from system accounts.
This program scans system accounts (/etc/passwd) and outputs a FTP virtual users list, suitable to the pure-pw command.
pure-statsdecode
Show human-readable dates from a “stats” logfile.
This program decodes Pure-FTPd’s “stats” log files and converts timestamps into human-readable dates.
pure-authd
External authentication agent for Pure-FTPd
pure-authd is a daemon that forks an authentication program, waits for an authentication reply, and feed them to an application server. pure-authd listens to a local Unix socket. A new connection to that socket should feed pure-authd the following structure: account:xxx password:xxx localhost:xxx localport:xxx peer:xxx
pure-certd
TLS certificate agent for Pure-FTPd.
pure-certd is a daemon that forks an authentication program, waits for a certificate path as a reply, and returns it to an application server. pure-certd listens to a local Unix socket. A new connection to that socket should send pure-authd the following structure: sni_name:xxx end These content is passed to the authentication program, as an environment variable: CERTD_SNI_NAME The authentication program should take appropriate actions to select a TLS certificate, and reply to the standard output with the fol‐lowing format: action:strict cert_file:/path/to/cert.pem key_file:/path/to/cert.pem end
pure-ftpd
simple File Transfer Protocol server
Pure-FTPd is a small, simple server for the old and hairy File Transfer Protocol, designed to use less resources than older servers,be smaller and very secure, and to never execute any external program. It support most-used features and commands of FTP (including many modern extensions), and leaves out everything which is deprecated,meaningless, insecure, or correlates with trouble. IPv6 is fully supported.
pure-ftpwho
Report current FTP sessions.
pure-ftpwho shows current Pure-FTPd client sessions. Only the system administrator may run this. Output can be text (default), HTML, XML data and parser-optimized. The server has to be compiled with –with-ftpwho to support this command.
pure-mrtginfo
provide an MRTG-graphable user count for ftpd.
Pure-Mrtginfo counts the number of clients currently connected to ftpd(8) and output the format in a format graphable by MRTG.
pure-quotacheck
Update virtual quota files for Pure-FTPd.
pure-quotacheck create a .ftpquota file in the specified directory. This file contains the current file and size of the directory, and it is used by Pure-FTPd when virtual quotas are enabled. It’s recommended to periodically run pure-quotacheck for every user, in crontabs.
pure-uploadscript
Automatically run an external program after a successful upload.
If Pure-FTPd is compiled with –with-uploadscript (default in binary distributions), and if the -o (or –uploadscript) is passed to the server, a named pipe called /var/run/pure-ftpd.upload.pipe is created. You will also notice an important file called /var/run/pure-ftpd.upload.lock, used for locking. After a successful upload, the file name is written to the pipe. pure-uploadscript reads this pipe to automatically run any program or script to process the newly uploaded file.