文件共享服务
补充知识:iSCSI
概括的说,iSCSI 是一种存储设备远程映射技术,它可以将一个远程服务器上的存储设备映射到本地,并呈现为一个块设备(大白话就是磁盘)。从普通用户的角度,映射过来的磁盘与本地安装的磁盘毫无差异。
这种映射方式基于是基于 SCSI 协议的,SCSI 协议是计算机与外围设备(例如硬盘、光盘等)通信的协议。而 iSCSI 则是通过 TCP 协议对 SCSI 进行封装的一种协议,也就是通过以太网传输 SCSI 协议的内容。
存储类型
存储类型分为三类:
直连式存储:Direct-Attached Storage,简称 DAS
网络附加存储:Network-Attached Storage,简称 NAS
存储区域网络:Storage Area Network,简称 SAN
FC:Fibre Channel 光纤

三种存储比较

三种存储应用场景
- DAS 虽然比较古老了,但是还是很适用于那些数据量不大,对磁盘访问速度要求较高的中小企业
- NAS 多适用于文件服务器,用来存储非结构化数据,虽然受限于以太网的速度,但是部署灵活,成本低
- SAN 则适用于大型应用或数据库系统,缺点是成本高、较为复杂
FTP 服务
文件传输协议:File Transfer Protocol,基于 C/S 结构
数据传输格式:二进制(默认)和文本
双通道协议:命令和数据传输使用不同的端口
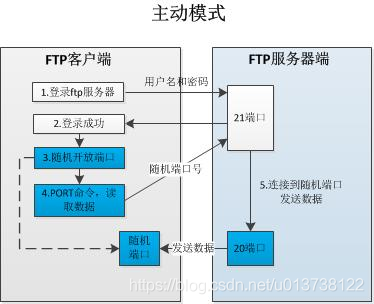
两种模式:从服务器角度命令 主动 和 被动 模式
主动模式:Port Style
windows 连接 FTP 服务器默认使用主动模式
![]()
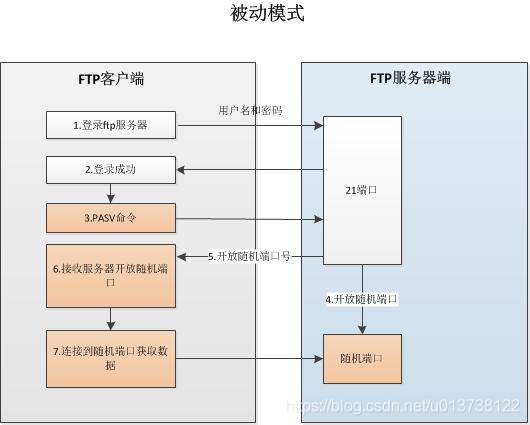
被动模式:PASV Style
![]()
FTP 服务状态码:
1 | 1XX:信息 125:数据连接打开 |
用户认证:
1 | 匿名用户:ftp、anonymous,对应Linux用户ftp |
常见 FTP 相关软件:
FTP 服务器端软件
Wu-ftpd、Proftpd、Pureftpd、Filezilla Server、Serv-U、Wing FTP Server、IIS
vsftpd:Very Secure FTP Daemon,CentOS 默认 FTP 服务器
客户端软件
ftp、lftp、lftpget、wget、curl
vsftpd
1 |
pureftpd
1 |
NFS 服务
工作原理
Network File System:网络文件系统,基于内核的文件系统。通过 NFS,用户和程序可以像访问本地文件一样去访问远端系统上的文件,基于 RPC(Remote Procedure Call Protecol)实现。
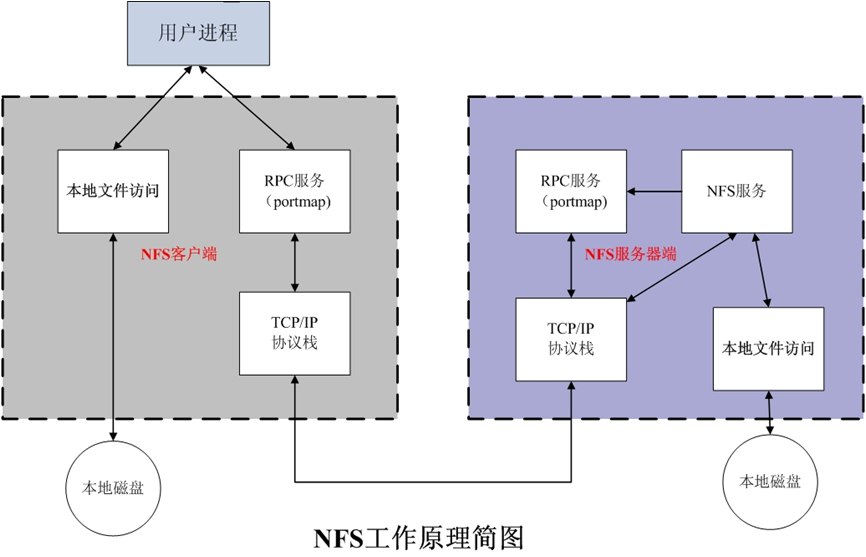
上图中的 portmap,自 centos6 之后就被 rpcbind 代替了
优点:节省本地存储空间,将常用的数据,如:/home 目录,存放在 NFS 服务器上且可以通过网络访问,本地终端将可减少自身存储空间的使用
缺点:1. 占用带宽;2. 端口号比较多,而且不固定,防火墙不太好配;所以 nfs 一般不用在互联网,都是用在局域网
nfs 软件介绍
软件包:nfs-utils(包括服务器和客户端相关工具)
相关软件包:rpcbind(必须)、tcp_wrappers
kernel 支持:nfs.ko
端口:2049(nfsd),其他端口由 portmap 分配
nfs 服务主要进程:
- rpc.nfsd:最主要的 NFS 进程,管理客户端是否可登录
- rpc.mountd:挂载和卸载 NFS 文件系统,包括权限管理
- rpc.lockd:非必要,管理文件锁,避免同时写出错
- rpc.statd:非必要,检查文件一致性,可修复文件
日志:/var/lib/nfs
配置文件:/etc/exports 和 /etc/exports.d/*.exports
nfs 配置文件
1 | /dir host1(opt1,opt2) host2(opt1,opt2) |
host 格式:支持通配符 *、ipv4、ipv6、FQDN(全域名)、NIS 域的主机组
opt 格式:
1
2
3
4
5
6
7
8
9
10默认选项:(ro,sync,root_squash,no_all_squash)
ro:只读
rw:可读可写
async:异步,数据变化后不立即写磁盘,先写入到缓冲区中,过一段时间再写入磁盘,性能高,安全性低
sync:1.0.0后为默认,同步,数据在请求时立即写入共享存储磁盘,性能低,安全性高
root_squash:默认,远程root映射为nobody(CentOS7以前的版本为nfsnobody),UID为65534
no_root_squash:远程root映射成NFS服务器的root用户,squash的意思是压榨
all_squash:所有远程用户(包括root)都被压榨
no_all_squash:默认,保留共享文件的UID和GID,即不压榨
anonuid和anongid:指明匿名用户映射为特定用户UID和组GID,而非nobody,可配合all_squash使用
1 |
|
nfs 工具
fpcinfo
rpcinfo 工具可以查看 RPC 相关信息
1 | # 查看注册在指定主机的RPC程序 |
范例:
1 | [root@centos8 ~]#rpcinfo -p |
exportfs
用于管理 NFS 导出的文件系统
1 | exportfs [-avi] [-o options,..] [client:/path ..] |
- -v:查看本机所有 NFS 共享
- -r:重读配置文件,这个选项可以避免重启服务
- -a:输出本机所有共享
- -au:停止本机所有共享
showmount
常见用法:查看远程主机的 nfs 共享
1 | showmount -e hostname |
范例:
1 | [root@centos7 ~]#showmount -e 10.0.0.8 |
monut
客户端 nfs 挂载
1 | mount [-fnrsvw] -t nfs [-o options] device dir |
options:
- nfsvers=n
- vers=n
- soft / hard
范例:
1 |
自动挂载 autofs
使用 autofs 服务按需要挂载外围设备,NFS 共享等,并在空闲 5 分钟后后自动卸载
配置文件:/etc/auto.master
案例:
10.0.0.1(ubuntu):nfs server,共享/data/wwwroot/script 目录
10.0.0.71(centos):nfs client
1 | # 10.0.0.1 |
/etc/fstab 和 autofs
/etc/fstab 设置开机自动挂载,系统开机会去读取这个文件,用于挂载本地固定设备,如硬盘
autofs 设置自动挂载,只有当访问挂载点的时候,autofs 才会挂载,过一段时间没有访问,autofs 就会自动卸载设备,用于挂载动态的设备,如光盘、nfs、smb 等文件系统
SAMBA 服务
相关包:
- samba 提供 smb 服务器端
- samba-client 客户端软件
- samba-common 通用软件
- cifs-utils smb 客户端工具
- samba-winbind 和 AD 相关
相关服务进程:
- smbd 提供 smb(cifs)服务 TCP:139、445
- nmbd NetBIOS 名称解析 UDP:137、138,如果不使用计算机名来访问,这个就没用
主配置文件:/etc/samba/smb.conf
语法检查: testparm [-v] [/etc/samba/smb.conf]
客户端工具:smbclient、mount.cifs
samba 服务器配置
/etc/samba/smb.conf 是主配置文件,ini 格式,来自 samba-common 包
分为全局配置[global] 和特定的共享设置,例如[homes]、[printers]等\
smb.conf 中的宏定义
1 | %m 客户端主机的NetBIOS名 |
[global] 全局配置
workgroup:指定工作组名称
server string:主机注释信息
netbios name:指定 NetBIOS 名,可以被 SAMBA 客户端使用,但不支持 ping
注意:netbios name 需要启动 nmb 服务
范例:
1
2
3[global]
workgroup = workgroup
netbios name = smbserver # 此设置需要启动nmb服务才可能生效interfaces:指定服务侦听接口和 IP
hosts allow: 允许指定主机访问,可用逗号,空格,或 tab 分隔,默认允许所有主机访问,可以在其他共享独立配置,但是[global]中的设置会覆盖其他共享设置,可以是以下格式:
1
2
3
4172.16.0.0/24
172.16.0.0/255.255.255.0
desktop.example.com
.example.com # 以example.com后缀的主机名hosts deny:拒绝指定主机访问,格式和 hosts allow 相同
config file=/etc/samba/conf.d/%U:用户独立的配置文件
log file=/var/log/samba/log.%I:不同客户机采用不同日志
log level = 2:日志级别,默认为 0,不记录日志
范例:
1
2
3[global]
Log file=/var/log/samba/log.%I
log level = 2max log size=50:日志文件达到 50K,将轮循 rotate,单位 KB
security=user:认证方式,有三种
- user:samba 用户(采有 linux 用户,samba 的独立口令)
- share:匿名(CentOS7 不再支持),已不建议使用
- server:已不建议使用
passdb backend = tdbsam:密码数据库格式
…
特定共享目录配置
1 | [共享名称] # 远程网络看到的共享名称 |
范例:
1 | [share] |
samba 用户管理
smbpasswd 命令
smbpasswd 用于管理 samba 用户
添加用户:实际上是把把系统用户映射为 samba 用户,所以添加的用户首先必须是 linux 系统用户
1 | smbpasswd -a <user> # 交互式 |
修改用户密码:
1 | smbpasswd <user> # 交互式 |
删除用户和密码:
1 | smbpasswd -x <user> |
查看 samba 用户列表:
1 | pdbedit -L -v |
范例:
1 | # 为了方便配置,可以将用户指定同一个组 |
案例:
实现不同 samba 用户访问相同的 samba 共享,实现不同的配置
1 | # 10.0.0.71 服务端 |
数据的实时同步
实现实时同步的方法:
- inotify + rsync
- sersync:国人周洋在 inotify 基础上开发的,功能强大,只是已经不再更新了
inotify
异步的文件系统事件监控机制,利用事件驱动机制,而无须通过诸如 cron 等的轮询机制来获取事件,linux 内核从 2.6.13 起支持 inotify,通过 inotify 可以监控文件系统中添加、删除,修改、移动等各种事件
inotify+rsync 使用方式:
- 利用监控服务(inotify),监控同步数据服务器目录中信息的变化
- 发现目录中数据产生变化,就利用 rsync 服务推送到备份服务器上
- 利用脚本进行结合
inotify 内核参数
- max_queued_events:inotify 事件队列最大长度,如值太小会出现 Event Queue Overflow 错误,默认值:16384, 生产环境建议调大,比如:327679
- max_user_instances:每个用户创建 inotify 实例最大值,默认值:128
- max_user_watches:可以监视的文件的总数量(inotifywait 单进程),默认值:8192,建议调大
1 | [root@data-centos8 ~]#vim /etc/sysctl.conf |
inotify-tools
1 | [root@c71 ~]$yum -y install inotify-tools |
inotifywait
1 | inotifywait [ options ] file1 [ file2 ] [ file3 ] [ ... ] |
范例:
1 | # 监控一次性事件 |
inotifywatch
1 | inotifywatch [ options ] file1 [ file2 ] [ ... ] |
rsync
rsync 常用做镜像备份和同步数据,配合计划任务实现定时备份,配合 inotify 可以实现触发式的实时数据同步
官方网站: http://rsync.samba.org/
软件包:rsync、rsync-daemon(CentOS 8)
服务文件:/usr/lib/systemd/system/rsyncd.service
配置文件:/etc/rsyncd.conf
端口:873/tcp
1 | # 1. 源地址 和 目标地址 都在本机 |
前两种的本质是通过本地或远程 shell,而第 3 种方式则是让远程主机上运行 rsyncd 服务,使其监听在一个端口上,等待客户端的连接
范例:备份服务器启动 rsync 的守护进程,然后数据服务器去连接,再进行数据的推送和拉取
1 | # 备份服务器 10.0.0.71 |
rsyncd.conf 的格式 参考 man rsyncd.conf 或者 https://linux.die.net/man/5/rsyncd.conf
上面的过程都是免密的,我们也可以设置认证
1 | # 备份服务器 10.0.0.71 |
inotify+rsync+shell 脚本 实现实时数据同步
备份数据库是:10.0.0.71,inotifywait 监控文件变化,rsync 负责同步数据
1 | SRC='/data/www/' #注意最后的/ |
sersync 实现实时数据同步
sersync 虽然快 10 年没更新了,但是还是比较好用的
sersync 项目地址: https://code.google.com/archive/p/sersync/
sersync 下载地址: https://code.google.com/archive/p/sersync/downloads
sersync 类似于 inotify,同样用于监控,但它克服了 inotify 的缺点
inotify 最大的不足是会产生重复事件,或者同一个目录下多个文件的操作会产生多个事件,例如,当监控目录中有 5 个文件时,删除目录时会产生 6 个监控事件,从而导致重复调用 rsync 命令。另外比如:vim 文件时,inotify 会监控到临时文件的事件,但这些事件相对于 rsync 来说是不应该被监控的
sersync 优点:
- c++编写,速度快
- 对 linux 系统文件系统产生的临时文件和重复的文件操作进行过滤,所以在结合 rsync 同步的时候,节省了运行时耗和网络资源
- 配置很简单,其中提供了静态编译好的二进制文件和 xml 配置文件,直接使用即可
- 使用多线程进行同步,尤其在同步较大文件时,能够保证多个服务器实时保持同步状态
- 有出错处理机制,通过失败队列对出错的文件重新同步,如果仍旧失败,则按设定时长对同步失败的文件重新同步
- 不仅可以实现实时同步,另外还自带 crontab 功能,只需在 xml 配置文件中开启,即也可以按要求隔一段时间整体同步一次,而无需再额外配置 crontab 功能
- 可以二次开发
sersync 只有两个文件:
二进制程序文件 sersync2
1
2
3
4
5
6
7
8
9
10
11
12
13
14
15
16
17lujinkai@Z510:/usr/local/sersync$ ./sersync2 -h
set the system param
execute:echo 50000000 > /proc/sys/fs/inotify/max_user_watches
sh: 1: cannot create /proc/sys/fs/inotify/max_user_watches: Permission denied
execute:echo 327679 > /proc/sys/fs/inotify/max_queued_events
sh: 1: cannot create /proc/sys/fs/inotify/max_queued_events: Permission denied
parse the command param
_______________________________________________________
参数-d:启用守护进程模式
参数-r:在监控前,将监控目录与远程主机用rsync命令推送一遍
c参数-n: 指定开启守护线程的数量,默认为10个
参数-o:指定配置文件,默认使用confxml.xml文件
参数-m:单独启用其他模块,使用 -m refreshCDN 开启刷新CDN模块
参数-m:单独启用其他模块,使用 -m socket 开启socket模块
参数-m:单独启用其他模块,使用 -m http 开启http模块
不加-m参数,则默认执行同步程序配置文件 confxml.xml
1
2
3
4
5
6
7
8
9
10
11
12
13
14
15
16
17
18
19
20
21
22
23
24
25
26
27
28
29
30
31
32
33
34
35
36
37
38
39
40
41
42
43
44
45
46
47
48
49
50
51
52
53
54
55
56
57
58
59
60
61
62
63
64
65
66
67
68
69lujinkai@Z510:/usr/local/sersync$ vim confxml.xml
<?xml version="1.0" encoding="ISO-8859-1"?>
<head version="2.5">
<host hostip="localhost" port="8008"></host>
<debug start="false"/> # 是否开启调试模式
<fileSystem xfs="false"/>
<filter start="false"> # 是否开启文件过滤功能
<exclude expression="(.*)\.svn"></exclude>
<exclude expression="(.*)\.gz"></exclude>
<exclude expression="^info/*"></exclude>
<exclude expression="^static/*"></exclude>
</filter>
<inotify> # 监控的事件
<delete start="true"/>
<createFolder start="true"/>
<createFile start="false"/>
<closeWrite start="true"/>
<moveFrom start="true"/>
<moveTo start="true"/>
<attrib start="false"/> # 修改此行为true,文件属性变化后也会同步
<modify start="false"/>
</inotify>
<sersync> # rsync命令的配置段
<localpath watch="/opt/tongbu"> # 同步的目录
# name是远程rsyncd的模块名,如果下面ssh标签开启了start,name则为远程sehll方式运行的目标目录
<remote ip="127.0.0.1" name="tongbu1"/>
<!--<remote ip="192.168.8.39" name="tongbu"/>-->
<!--<remote ip="192.168.8.40" name="tongbu"/>-->
</localpath>
<rsync>
<commonParams params="-artuz"/> # 指定rsync选项
<auth start="false" users="root" passwordfile="/etc/rsync.pas"/>
<userDefinedPort start="false" port="874"/><!-- port=874 -->
<timeout start="false" time="100"/><!-- timeout=100 -->
<ssh start="false"/> # 默认使用rsync daemon运行rsync命令,true为使用远程shell模式
</rsync>
# 错误重传及日志文件路径,默认60分钟
<failLog path="/tmp/rsync_fail_log.sh" timeToExecute="60"/>
<crontab start="false" schedule="600"> # 定时,默认600分钟
<crontabfilter start="false"> # 是否开启定时
<exclude expression="*.php"></exclude>
<exclude expression="info/*"></exclude>
</crontabfilter>
</crontab>
<plugin start="false" name="command"/>
</sersync>
#####################################以下行不需要修改####################################
<plugin name="command">
<param prefix="/bin/sh" suffix="" ignoreError="true"/> <!--prefix /opt/tongbu/mmm.sh suffix-->
<filter start="false">
<include expression="(.*)\.php"/>
<include expression="(.*)\.sh"/>
</filter>
</plugin>
<plugin name="socket">
<localpath watch="/opt/tongbu">
<deshost ip="192.168.138.20" port="8009"/>
</localpath>
</plugin>
<plugin name="refreshCDN">
<localpath watch="/data0/htdocs/cms.xoyo.com/site/">
<cdninfo domainname="ccms.chinacache.com" port="80" username="xxxx" passwd="xxxx"/>
<sendurl base="http://pic.xoyo.com/cms"/>
<regexurl regex="false" match="cms.xoyo.com/site([/a-zA-Z0-9]*).xoyo.com/images"/>
</localpath>
</plugin>
</head>
基于 rsync daemon 实现 sersync
1 | # 下载 |
基于远程 shell 实现 sersync
1 | # 首先配置ssh基于key的自动验证,过程略... |